•
Follow
Liked by rachelallencooks and others
 ballymaloe_house
- A feast for all your senses, tomato salad with radishes and salad leaves #onthemenu
Photo from the pass @dervilla_oflynn 👩🍳

Nutrition key to sound health
•
Follow
Liked by rachelallencooks and others
ballymaloe_househttps://www.instagram.com/reel/DaYv5bmSorq/?igsh=ejZ6NjlseWF4YnR5


and

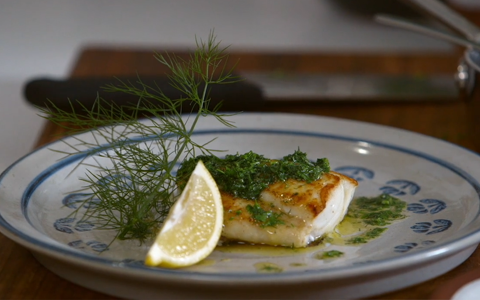
This way of cooking fish is perceived as being rather old fashioned, but if you have a really fresh fish, it can be fabulous and quite contemporary in its simplicity. Hake, cod, ling and mackerel are all delicious cooked in this way. The relish served here is classic, and when properly prepared, it will remind you why herbs, butter and lemon will always have a place at the table when fresh fish is being served.
To cook the fish, place the grill pan on a medium heat and allow to become quite hot. You don’t want it smoking madly, but should see a light haze, almost like vapour, arising from the pan. Dry the fish fillets with paper towel and dip in the seasoned flour and shake off the excess. You can skip this flouring stage if you wish. With a knife, lightly butter the flesh side of the fish fillets. Place the fish, buttered sides down on the hot grill. The fish should sizzle immediately it hits the pan, if it doesn’t, the pan wasn’t hot enough and you need to crank up the heat immediately. If you have difficulty determining if the pan is hot enough, take one of the pieces of fish and holding it above the pan, just place a corner of the buttered side onto the grill. If it sizzles, it is fine to proceed, if it doesn’t then allow the pan to get hotter. Let the fish cook, still on a high heat until the fish is well coloured. There should be a bit of smoke coming from the pan, but not great clouds of it, so adjust the heat accordingly. Lift the fish at one corner to check if it is golden and getting crisp. When you are confident this stage has been reached, turn the heat down a little and with the help of a fish or egg slice, turn the fish over on to the skin side. Let it continue to cook until the skin is crispy and the fish is cooked through. You will know the fish is cooked when the flesh appears to be white and creamy in colour and no longer looks translucent.
While the fish is cooking, melt the butter for the relish. Allow the butter to cool a little before stirring in the chopped herbs.
Remove the cooked fish to hot serving plates, placing them with the golden flesh side up. Place a wedge of lemon on each plate and drizzle the herb relish over.
If you wish garnish with a spring of parsley and serve immediately.
http://www.bordbia.ie/consumer/recipes/roryoconnell/pages/grilledfishwithherbrelish.aspx
https://www.instagram.com/reel/DZ2_JX7MGz9/?igsh=MTM4bTUwdDZkeXNz

https://www.instagram.com/reel/DTOvkcbDl1G/?igsh=cGE4eXFtNTFwYXN5
and
•
Follow
Liked by rachelallencooks and others
ballymaloe_house

Verified

ballymaloecookeryschool and others
rachelallencooksVerifiedHappy Homemade Bread Day 🍞rachelallencooksVerifiedThis quantity will make one 23 cm tear-and-share loaf.rachelallencooksVerifiedOn a very lightly floured work surface, place one ball of dough. Fold the edges, all the way round, into the centre of the ball of dough, squashing it down in the centre as you go. Turn the ball over so that the folded side is on the underside and the smooth side is on top. Roll the ball gently under the palm of your hand to make a round roll then place into the prepared tin. Repeat with all the other balls of dough so that you end up with 7 around the sides, spaced apart, and one ball in the centre. Now cover with the tea towel again and place on the worktop or somewhere a little warmer, again not above 45’C , and allow to rise again until almost doubled in size, about 35-45 minutes.
Exquisite pear and almond tart video recipe from Rachel Allen. Ideal for people who don’t want to make pastry. Pears can be also replaced with a variety of different fruits. Find more recipes on: http://www.Kerrygoldusa.com/recipes