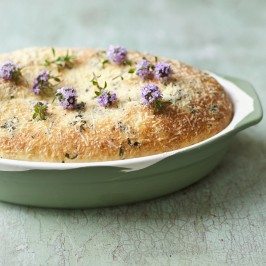
This scone recipe can also be made into one large loaf cooked on a baking sheet. Cut a deep cross in the center and bake in the preheated oven for 20 minutes, then reduce the heat to 400ºF (200ºC), Gas mark 6 and continue to cook for another 20 minutes until the base sounds hollow when tapped.
Ingredients:
2 2/3 cups (1lb) plain flour, extra for dusting
1 tsp salt
1 tsp bicarbonate of soda
1 tsp caster sugar
2 tbsp (1oz) Kerrygold Salted Butter, chilled and diced
1 cup (8fl oz) buttermilk
1 large egg, beaten
Kerrygold butter curls and strawberry jam, to serve
Directions:
Preheat the oven to 425°F (220°C), Gas mark 7. Sift the flour into a bowl with the salt and bicarbonate of soda. Stir in the sugar and then, using your fingertips, rub in the butter until the mixture resembles fine breadcrumbs.
Make a well in the center and pour in the buttermilk and beaten egg. Using a tablespoon, gently and quickly stir the liquid into the flour. It should be soft but not sticky. Lightly flour the work surface. Turn the dough out onto it and pat into a circle about 1in (2.5cm) thick. Cut into triangles with a sharp knife or stamp out 2in (5cm) rounds with a cutter.
Arrange the scones on a non-stick baking sheet and bake for 15 minutes until well risen and golden brown. Leave to cool for at least 10 minutes on a wire rack, then serve with the butter curls and jam.
Cheddar variety
Mix ¼ cup (1oz) (25g) of Kerrygold grated Aged Cheddar in with the buttermilk. Brush the finished scones with melted Kerrygold butter and sprinkle with another ¾ cup (3oz) (75g) grated Kerrygold Aged Cheddar before baking. Mix 1 teaspoon wholegrain mustard into 2 tbsp (1oz) (25g) of butter and use to spread on the split baked scones before topping with sliced cooked ham or tomatoes to serve.
Fruit variety
Add ½ cup (2oz) (50g) of sultanas or raisins or dried pitted cherries when stirring the sugar into the dry ingredients, then finish as described above.
This is a Japanese tear-and-share loaf of bread with the most wonderful pillowy soft texture. It’s inspired by the Yudane and Tangzhong method where a little bit of flour and water or milk (both in this case) are cooked together to make a white sauce before mixing in the remaining ingredients. This method pre-gelatinises the starch in the flour allowing it to absorb more liquid, giving you a super-light loaf that stays fresh for longer as it retains the moisture.
It also is divine with cinnamon, cardamom,dried fruit and/or candied peel added as a sweet treat.
Here’s the recipe 👇🏽 below in Comments in 2 parts! Happy baking 🧡
This bread can be made so easily using a Thermomix @thermomixukandireland too!Edited · 3h
rachelallencooksVerifiedThis quantity will make one 23 cm tear-and-share loaf.
50g water 50g milk 15g strong white flour
375g strong white flour 15g milk powder 25g caster sugar 1 teaspoon salt 115g milk 1 egg, beaten 25g fresh yeast or 12g dried yeast 50g butter, melted
Pour the water and the milk into a small saucepan and bring to the boil. Add in the 15g of flour & cook, whisking all the time, over the heat for a couple of minutes until the liquid has thickened to a white sauce. Tip the white sauce into a bowl & cool. Place the 375g of strong white flour in a mixing bowl, or the bowl of an electric food mixer (with the dough hook attached) ) with the milk powder, the sugar & the salt, & mix. Now place the milk in a separate bowl & add in the beaten egg, the yeast,the melted butter & the white sauce. Stir then pour all of this liquid into the dry ingredients & mix to a dough. Knead for 8-10 minutes by hand or in the machine until you have a smooth and almost springy dough, don’t add flour while you’re kneading, the dough is supposed to be slightly sticky. When I’m using a stand mixer for this I scrape down the sides of the bowl a couple of times during kneading. When the dough has been kneaded enough it will be smooth on the outside. Press it with a floured finger and the dent that you make with your finger should spring back a little bit. Place the dough into a bowl that’s large enough to take the dough when doubled in size (or leave it in the stand mixer bowl) & cover the bowl with a clean tea towel or a plate. Place it somewhere warm, not above 45’C, or just standing on the counter in your kitchen and allow the dough to double in size, this may take 2 hours. If you wish you can place the covered bowl of dough in the fridge overnight. When the dough has doubled in size, using a floured fist, punch the dough down to knock it back then knead it for just 1 minute. Brush a 23cm spring-form tin with melted butter, then dust with flour. Divide the dough into 8 equal pieces, each weighing about 90g. Keep all dough covered with a clean tea towel while you work with one ball of dough. On a very lightly floured work surface, place one ball of dough.2 likesReply
rachelallencooksVerifiedOn a very lightly floured work surface, place one ball of dough. Fold the edges, all the way round, into the centre of the ball of dough, squashing it down in the centre as you go. Turn the ball over so that the folded side is on the underside and the smooth side is on top. Roll the ball gently under the palm of your hand to make a round roll then place into the prepared tin. Repeat with all the other balls of dough so that you end up with 7 around the sides, spaced apart, and one ball in the centre. Now cover with the tea towel again and place on the worktop or somewhere a little warmer, again not above 45’C , and allow to rise again until almost doubled in size, about 35-45 minutes. Preheat an oven to 200’C. The dough is ready when you make a little dent with a floured finger and it doesn’t spring back. Also, the balls of dough should have joined together at this stage. Whisk the egg with a pinch of salt and brush very gently over the top of the risen bread. Place the bread in the lower part of the preheated oven to bake for 30-40 minutes. The dough, out of the tin, should sound hollow when you tap it on the base. If you wish you can bake the bread out of the tin for the last 5 minutes of cooking time. Place on a wire rack to cool.2 likesReply
leanwithlesleyLooks delicious, reminds me of your ciabatta/tabata 😂❤️Reply
Weigh the eggs. Take the same weight in butter, sugar and flour. Beat the butter and sugar together until pale and light in texture. Wash the oranges and add the finely grated rind of 2 and the juice of 1 to the butter mixture. Mix the flour and baking powder and add alternately with the eggs. Beat thoroughly. Bake in a 24cm (91/2in) tin in a moderate oven, 180°C/350°F/gas 4, for 50 minutes approx. Cool the cake and split it in two. Sandwich with the orange butter icing and spread the chocolate icing over the top and sides allowing any excess to run off.
To make the orange butter icing, finely grate the rind of the orange and squeeze out the juice. Beat the icing sugar, butter and orange rind together. Add in enough juice to make the icing a spreading consistency.
To make the chocolate icing, melt the chocolate in the water. Remove from the heat and beat in the butter and then the eggs very thoroughly. Leave to cool and set before icing and filling the cake.
These oaty squares by Lili Forberg make the perfect lunchbox snack!
Serves 25|Takes 40 minutes
INGREDIENTS:
2 Cups or 200 g Flahavan’s Organic Porridge Oats 2 eggs 1/3 cup or 70 g melted butter 1 cup or 250 ml milk 3 tbsp or 40 g brown sugar 1/3 cup or 50 g seeds 1 tsp vanilla essence 1 cup or 150 g fresh raspberries and blueberries
METHOD:
Mix all ingredients leaving the berries until last. Pour into a greased and lined baking tray and flatten with a spoon. Bake on 200° for 30 mins Cut according to the size you’d like.
Recipe Categories:
“Happiness is enjoying the little things in life..”
Why not bake these delicious baked berry squares with oats?! Perfect for an afternoon of cooking with the kids.
Ingredients:
235 g rolled Flahavan’s oats
2 eggs
90 g blueberries
120 g apple compote
40 g brown sugar
240 ml skimmed milk
15 g milled flaxseed
1 1⁄2 tsp baking powder
1 1⁄2 tsp cinnamon
1 tsp vanilla extract
1⁄4 tsp salt
Method:
Preheat the oven to 175°C/350°F/gas 4.
Mix the oats, eggs, blueberries, apple compote, brown sugar, skimmed milk, flaxseed, baking
powder, cinnamon, vanilla extract and salt together in a large bowl. Then pour into a 33 × 23 × 5 cm baking tin.
Bake in the oven until the liquid is absorbed and the oats are tender, about 25–30 minutes.
Cut into 12 equal-sized portions.
The name of this simple dessert comes from the Italian tirami su, meaning ‘pick me up’ (or ‘cheer me up’). Tiramisu has been subjected to many variations over the years, but this is the original recipe and – in my opinion – the best! This is a dessert that actually benefits from being made ahead, allowing the lovely flavours to mingle. As a result, it is perfect for a large gathering.
Serves 8–10
4 large eggs
100g caster sugar
250g mascarpone cheese 2
50ml cream
250ml freshly brewed strong espresso coffee (left to cool completely)
150ml Tia Maria or Kahlúa liqueur
40 sponge fingers
50g bar plain chocolate
2 tsp cocoa powder
Separate the eggs, putting the yolks in one bowl with 80g of the sugar, and the egg whites in another. Using an electric beater, whisk the egg yolks and sugar until pale and creamy, then mix in the mascarpone cheese until well combined. Whip the cream in a separate bowl until soft peaks form, then fold into the egg yolk and mascarpone mixture.
Using spotlessly clean beaters, whisk the egg whites with 20g of sugar until soft peaks form, then fold this into the mascarpone cream. Spoon a third of this mixture into a suitable dish that is at least 2cm deep. Pour the coffee into a shallow dish and stir in the Tia Maria or Kahlúa. Dip in enough of the sponge fingers to make an even layer on top of the mascarpone mixture. Only dip the sponge fingers in as you go along, so they don’t soak for too long and become difficult to handle.
Cover the layer of soaked sponge fingers with another third of the mascarpone mixture, then grate most of the chocolate bar on top using the coarse side of a grater. Add another layer with the rest of the soaked sponge fingers, then spoon over the remaining mascarpone mixture and spread evenly with a back of a spoon. Cover with cling film and chill overnight to allow the flavours to develop and the dessert to settle. To serve, give the tiramisu a good dusting of cocoa powder, then grate over the rest of the chocolate. Place in the middle of the table so that everyone can help themselves.
SERVE AFTER … A go-to dessert if you like spoiling your guests after a long Italian-inspired meal. Tiramisu is ideal for the warmer months since it can be made well in advance and kept in the fridge until needed.
Pavlova Wreath with Exotic Fruit
Cakes are always the sweet option of choice for birthdays and anniversaries. However, I would like to introduce to you the Pavlova Wreath – it is very pretty and easy to make, and it delivers an incredible flavour. As always, feel free to use your own favourite combination of flavours to personalise it. Be sure to produce it with a flourish for that ‘ta-da’ moment!
Serves 10–12
For the meringue
5 egg whites
250g caster sugar
50g icing sugar
2 tsp cornflour
For the raspberry sauce
200g raspberries
2 tbsp icing sugar
1 tbsp lime juice
2 tsp cornflour or arrowroot
For the crème Chantilly
200ml cream (well chilled)
1 tsp vanilla extract
40g icing sugar
To decorate
200g raspberries
400g tin lychees, well drained and cut in half
2 passion fruit, halved and seeds scooped out
Preheat the oven to 140°C (275°F/Gas Mark 1). Put the egg whites into the bowl of a stand mixer. Turn on to a medium speed and whisk until they begin to go frothy and hold their shape a little. Mix the caster and icing sugar together, then add about one third to the eggs in a steady stream, whisking all the time on medium to high. The mixture will now begin to thicken a little.
Make sure that all the sugar has dissolved before you add any more. Add the next third and repeat the process, whisking it all up well. Then add the final third of the sugar. Whisk on high now, since the egg mixture will be much more stable. Keep whisking until you reach the stiff-peak stage. Add the cornflour and fold in with a spoon. Draw a 25cm circle on a piece of parchment paper and use it to line a large baking sheet, then draw a 10cm circle in the middle. This is your stencil. Put dollops of the meringue mixture on to the wreath stencil, keeping it within the edges.
Bake for 55–60 minutes until the meringue has just a little colour. Remove it from the oven and leave to cool. Meanwhile, make the raspberry sauce. Blitz the raspberries in a food processor with the icing sugar and lime juice, then pass through a sieve into a small pan using a plastic spatula. Mix the cornflour or arrowroot with one tablespoon of water until smooth, then add this to the raspberries. Bring to the boil over medium to high heat, then simmer gently for a few minutes until thickened, stirring occasionally.
Set aside to cool. For the crème Chantilly, whisk up the cream, vanilla and sugar in a bowl until it is just beginning to hold soft peaks. Cover with cling film and chill until needed. Carefully slide your Pavlova wreath on to a large, flat serving plate. Place dollops of the crème Chantilly around the top of the wreath, then drizzle over some of the raspberry sauce; the rest can be served in a jug at the table. Decorate the wreath with the raspberries, lychees and passion fruit pulp. Serve straight away.
Ginger & Lime Baked Cheesecake with Irish Strawberry Compote Ingredients (Serves 6-8) For The Base: 2 Packs of Simply Better Handmade Oat & Ginger Cookies, crushed 75g Butter, plus extra for greasing For The Compote: 1 Bag of Simply Better Expertly Grown Frozen Irish Strawberries 250ml Simply Better Handmade Irish Raspberry & Wexford Rhubarb Cordial For the Filling: 3 Simply Better Free Range Corn Fed Large Eggs 500g Cream Cheese 100g Caster Sugar 1Tbsp Cornflour Finely Grated Rind and Juice of 2 Limes 1 Vanilla Pod, split in half lengthways and seeds scraped out To Serve: Simply Better Single Source Irish Jersey Cream, lightly whipped Method: 1. Preheat the oven to 160°C Lightly butter a 9inch loose-bottomed cake tin and line with non-stick baking or parchment paper. 2. To make the base, melt the butter in a pan set over a gentle heat. Add the crushed cookies and mix well. Spread the mixture over the base of the tin, pressing down with the back of a spoon to flatten. Place in the oven for 10 minutes to firm up. 3. Remove the tin from the oven and set aside. Place a dish of hot water in the oven on the bottom rack – this will stop a skin forming on the cheesecake. Place the cream cheese, sugar, eggs, lime rind and juice, vanilla seeds and cornflour in a mixing bowl and beat together until smooth with an electric whisk. 4. Pour this mixture into the cake tin and place on a baking sheet. Bake for 35-45 minutes until lightly golden. The filling should still be a bit wobbly at this stage. Turn off the oven, open the door and leave to cool completely. The filling will set as it cools. 5. To make the compote, place the leftover vanilla pod in a saucepan with the cordial and bring to the boil. Reduce the heat and allow to simmer for 5 minutes until reduced and slightly thickened. Place the strawberries in the pan and poach the berries for 2-3 minutes until softened but still holding their shape. Remove the vanilla pod before serving. 6. To serve, slice the cheesecake into wedges and serve with some cream and the poached strawberries.
Weigh the eggs. Take the same weight in butter, sugar and flour. Beat the butter and sugar together until pale and light in texture. Wash the oranges and add the finely grated rind of 2 and the juice of 1 to the butter mixture. Mix the flour and baking powder and add alternately with the eggs. Beat thoroughly. Bake in a 24cm (91/2in) tin in a moderate oven, 180°C/350°F/gas 4, for 50 minutes approx. Cool the cake and split it in two. Sandwich with the orange butter icing and spread the chocolate icing over the top and sides allowing any excess to run off.
To make the orange butter icing, finely grate the rind of the orange and squeeze out the juice. Beat the icing sugar, butter and orange rind together. Add in enough juice to make the icing a spreading consistency.
To make the chocolate icing, melt the chocolate in the water. Remove from the heat and beat in the butter and then the eggs very thoroughly. Leave to cool and set before icing and filling the cake.
a sprig of thyme, a few flat-leaf parsley stalks and a little scrap of bay
40g (1½oz) plain flour
5 organic eggs, separated
110g (4oz) goat’s cheese (we use Ardsallagh), crumbled
75g (3oz) Gruyère cheese, finely grated
50g (2oz) mature Coolea or Parmesan cheese, finely grated
good pinch of salt, cayenne, freshly ground black pepper
and nutmeg
2 teaspoons fresh thyme leaves
To serve
lots of thyme flowers, if available
green salad
Directions
We have several farmhouse goat’s-cheesemakers in Ireland.We use Ardsallagh goat’s cheese, St Tola from Inagh in Co.Clare is also heaven, as is Gortnamona from Cooleeneyfarm in Co. Tipperary and Corleggy from Co. Cavan.We bake this soufflé until golden and puffy in a shallow oval dish instead of the traditional soufflé bowl. It makes a perfect lunch or supper dish. Little individual bowls are also perfect as a starter. Reduce the cooking time accordingly.
Preheat the oven to 230°C/450°F/gas 8. Brush the bottom andsides of a 30cm (12in) shallow oval dish (not a soufflé dish) or six individual wide, rimmed soup bowls with melted butter.Put the cream and milk into a saucepan, add the carrot, onion,peppercorns and fresh herbs. Bring slowly to the boil, and then setaside to infuse for 10 minutes. Strain, discarding the flavourings(we rinse them off and throw them into the stockpot if there isone on the go).Melt the butter, add the flour and cook for a minute or two.Whisk in the strained cream and milk, bring to the boil and whisk
until the sauce thickens. Cool slightly. Add the egg yolks, goat’scheese, Gruyère and most of the Coolea or Parmesan (reservingsome for the topping). Season with salt, cayenne, freshly groundpepper and nutmeg. Taste and correct the seasoning.Whisk the egg whites stiffly and fold them gently into the mixtureto make a loose consistency. Spoon into the prepared dish, scatter thethyme leaves over the top and sprinkle with the reserved Coolea orParmesan.Bake in the preheated oven for 12–15 minutes (or 9–11 minutesfor the individual soufflés) or until the sides and top are nicely puffedup and golden – the centre should still be creamy. Garnish withthyme flowers. Serve immediately with a good green salad.
Cheat’s No Churn Vanilla & Sea Salt Ice-Cream with Roasted Frozen Berries and Grated White Chocolate | Summer ending doesn’t mean ice cream is off the menu and this straightforward method of making this ice cream might just convince you to take the plunge and make your own. Even if you don’t, and use shop bought, the trick of roasting frozen berries with a sprinkle of grated white chocolate will make you wonder why you haven’t been doing this for years, with ingredients as always from @dunnestores 🍦🍓 Give it a go this weekend!
Serves: 4 Time: 35 mins + overnight freezing time
For the ice cream: 2 vanilla pods, split in half, seeds scraped 200g condensed milk 600ml double cream 2 tsp flaky sea salt
For the roasted frozen berries: 300g frozen mixed berries 3 tbsp caster sugar 1 tbsp cornflour Juice of a lemon
To serve: 100g white chocolate, grated
1. Put the condensed milk, cream and vanilla pods & seeds into a large bowl. Using an electric mixer, whisk the mixture until thickened and stiff peaks form. Gently stir in the sea salt and spoon into a large loaf tin or large glass lunch box with a lid, cover and freeze overnight or until solid. 2. When you are about 25 minutes away from serving, preheat the oven to 180°C/160°C fan /350°F/Gas Mark 4. 3. Add the berries to a deep tray with the caster sugar, cornflour and lemon juice. Mix well to combine, add to a baking tray and transfer to the oven to roast for 15 minutes, stirring halfway, until the berries are broken down, glossy and juicy. 4. Remove the berries from the oven and allow to cool slightly then serve the ice cream into bowls. Top with the slightly warm berries then drown everything in the grated white chocolate.1d