To serve: Basmati rice, cooked 1 red chilli, sliced (optional) 1 spring onion, sliced (optional)
Method Marinate the salmon fillets for 10 minutes before cooking. Heat a frying pan over medium heat and add in the oil. Once hot, brush most of the marinade from the salmon and cook skin side down on the pan for 3 minutes. Flip and cook for another 3 minutes. Remove from the pan and pour the remaining teriyaki sauce into the pan and cook for 2 minutes on a low heat. Meanwhile, steam or boil the broccoli until al dente. Serve the salmon on a bed of basmati rice along with the broccoli and avocado. Drizzle over with remaining sauce and garnish with chilli slices and spring onion.4d
Ginger & Lime Baked Cheesecake with Irish Strawberry Compote Ingredients (Serves 6-8) For The Base: 2 Packs of Simply Better Handmade Oat & Ginger Cookies, crushed 75g Butter, plus extra for greasing For The Compote: 1 Bag of Simply Better Expertly Grown Frozen Irish Strawberries 250ml Simply Better Handmade Irish Raspberry & Wexford Rhubarb Cordial For the Filling: 3 Simply Better Free Range Corn Fed Large Eggs 500g Cream Cheese 100g Caster Sugar 1Tbsp Cornflour Finely Grated Rind and Juice of 2 Limes 1 Vanilla Pod, split in half lengthways and seeds scraped out To Serve: Simply Better Single Source Irish Jersey Cream, lightly whipped Method: 1. Preheat the oven to 160°C Lightly butter a 9inch loose-bottomed cake tin and line with non-stick baking or parchment paper. 2. To make the base, melt the butter in a pan set over a gentle heat. Add the crushed cookies and mix well. Spread the mixture over the base of the tin, pressing down with the back of a spoon to flatten. Place in the oven for 10 minutes to firm up. 3. Remove the tin from the oven and set aside. Place a dish of hot water in the oven on the bottom rack – this will stop a skin forming on the cheesecake. Place the cream cheese, sugar, eggs, lime rind and juice, vanilla seeds and cornflour in a mixing bowl and beat together until smooth with an electric whisk. 4. Pour this mixture into the cake tin and place on a baking sheet. Bake for 35-45 minutes until lightly golden. The filling should still be a bit wobbly at this stage. Turn off the oven, open the door and leave to cool completely. The filling will set as it cools. 5. To make the compote, place the leftover vanilla pod in a saucepan with the cordial and bring to the boil. Reduce the heat and allow to simmer for 5 minutes until reduced and slightly thickened. Place the strawberries in the pan and poach the berries for 2-3 minutes until softened but still holding their shape. Remove the vanilla pod before serving. 6. To serve, slice the cheesecake into wedges and serve with some cream and the poached strawberries.
flahavans No excuses… healthy and delicious porridge is the perfect way to start these cold Monday mornings! Warm and comforting, this quick and easy recipe takes just minutes to prepare, so whether you have breakfast at home or deskside, make sure it’s as tasty as it is pretty! Add some grated apple, pecan nuts, cinnamon and maple syrup to your morning porridge pot and take a minute to savour just how good it tastes! #BreakfastInspo#FlahavansOats
Serves 1|Takes 5 minutes
Ingredients
1 x Flahavan’s Quick Oats Pot Whole Milk (as per instructions on pack) 1 Large Red Apple Cinnamon Powder Maple Syrup 5-10g Pecan Nuts
Method:
Prepare the porridge as per the instructions on the Flahavan’s Quick Oats pot
Topping: Cut the apple into thin slices and then into matchsticks. Prepare your porridge, and add the apple as topping long with a sprinkling of cinnamon and a drizzle of maple syrup. Chop pecan nuts into thin pieces and sprinkle on top. 21h
To serve: Basmati rice, cooked 1 red chilli, sliced (optional) 1 spring onion, sliced (optional)
Method Marinate the salmon fillets for 10 minutes before cooking. Heat a frying pan over medium heat and add in the oil. Once hot, brush most of the marinade from the salmon and cook skin side down on the pan for 3 minutes. Flip and cook for another 3 minutes. Remove from the pan and pour the remaining teriyaki sauce into the pan and cook for 2 minutes on a low heat. Meanwhile, steam or boil the broccoli until al dente. Serve the salmon on a bed of basmati rice along with the broccoli and avocado. Drizzle over with remaining sauce and garnish with chilli slices and spring onion.4d
a sprig of thyme, a few flat-leaf parsley stalks and a little scrap of bay
40g (1½oz) plain flour
5 organic eggs, separated
110g (4oz) goat’s cheese (we use Ardsallagh), crumbled
75g (3oz) Gruyère cheese, finely grated
50g (2oz) mature Coolea or Parmesan cheese, finely grated
good pinch of salt, cayenne, freshly ground black pepper
and nutmeg
2 teaspoons fresh thyme leaves
To serve
lots of thyme flowers, if available
green salad
Directions
We have several farmhouse goat’s-cheesemakers in Ireland.We use Ardsallagh goat’s cheese, St Tola from Inagh in Co.Clare is also heaven, as is Gortnamona from Cooleeneyfarm in Co. Tipperary and Corleggy from Co. Cavan.We bake this soufflé until golden and puffy in a shallow oval dish instead of the traditional soufflé bowl. It makes a perfect lunch or supper dish. Little individual bowls are also perfect as a starter. Reduce the cooking time accordingly.
Preheat the oven to 230°C/450°F/gas 8. Brush the bottom andsides of a 30cm (12in) shallow oval dish (not a soufflé dish) or six individual wide, rimmed soup bowls with melted butter.Put the cream and milk into a saucepan, add the carrot, onion,peppercorns and fresh herbs. Bring slowly to the boil, and then setaside to infuse for 10 minutes. Strain, discarding the flavourings(we rinse them off and throw them into the stockpot if there isone on the go).Melt the butter, add the flour and cook for a minute or two.Whisk in the strained cream and milk, bring to the boil and whisk
until the sauce thickens. Cool slightly. Add the egg yolks, goat’scheese, Gruyère and most of the Coolea or Parmesan (reservingsome for the topping). Season with salt, cayenne, freshly groundpepper and nutmeg. Taste and correct the seasoning.Whisk the egg whites stiffly and fold them gently into the mixtureto make a loose consistency. Spoon into the prepared dish, scatter thethyme leaves over the top and sprinkle with the reserved Coolea orParmesan.Bake in the preheated oven for 12–15 minutes (or 9–11 minutesfor the individual soufflés) or until the sides and top are nicely puffedup and golden – the centre should still be creamy. Garnish withthyme flowers. Serve immediately with a good green salad.
Cheat’s No Churn Vanilla & Sea Salt Ice-Cream with Roasted Frozen Berries and Grated White Chocolate | Summer ending doesn’t mean ice cream is off the menu and this straightforward method of making this ice cream might just convince you to take the plunge and make your own. Even if you don’t, and use shop bought, the trick of roasting frozen berries with a sprinkle of grated white chocolate will make you wonder why you haven’t been doing this for years, with ingredients as always from @dunnestores 🍦🍓 Give it a go this weekend!
Serves: 4 Time: 35 mins + overnight freezing time
For the ice cream: 2 vanilla pods, split in half, seeds scraped 200g condensed milk 600ml double cream 2 tsp flaky sea salt
For the roasted frozen berries: 300g frozen mixed berries 3 tbsp caster sugar 1 tbsp cornflour Juice of a lemon
To serve: 100g white chocolate, grated
1. Put the condensed milk, cream and vanilla pods & seeds into a large bowl. Using an electric mixer, whisk the mixture until thickened and stiff peaks form. Gently stir in the sea salt and spoon into a large loaf tin or large glass lunch box with a lid, cover and freeze overnight or until solid. 2. When you are about 25 minutes away from serving, preheat the oven to 180°C/160°C fan /350°F/Gas Mark 4. 3. Add the berries to a deep tray with the caster sugar, cornflour and lemon juice. Mix well to combine, add to a baking tray and transfer to the oven to roast for 15 minutes, stirring halfway, until the berries are broken down, glossy and juicy. 4. Remove the berries from the oven and allow to cool slightly then serve the ice cream into bowls. Top with the slightly warm berries then drown everything in the grated white chocolate.1d
flahavans No excuses… healthy and delicious porridge is the perfect way to start these cold Monday mornings! Warm and comforting, this quick and easy recipe takes just minutes to prepare, so whether you have breakfast at home or deskside, make sure it’s as tasty as it is pretty! Add some grated apple, pecan nuts, cinnamon and maple syrup to your morning porridge pot and take a minute to savour just how good it tastes! #BreakfastInspo#FlahavansOats
Serves 1|Takes 5 minutes
Ingredients
1 x Flahavan’s Quick Oats Pot Whole Milk (as per instructions on pack) 1 Large Red Apple Cinnamon Powder Maple Syrup 5-10g Pecan Nuts
Method:
Prepare the porridge as per the instructions on the Flahavan’s Quick Oats pot
Topping: Cut the apple into thin slices and then into matchsticks. Prepare your porridge, and add the apple as topping long with a sprinkling of cinnamon and a drizzle of maple syrup. Chop pecan nuts into thin pieces and sprinkle on top. 21h
Of course this recipe is great with just parsley but experiment with a combination of soft fragrant herbs sauce as parsley, chives, tarragon or chervil depending on what’s available.
Serves 4
Ingredients
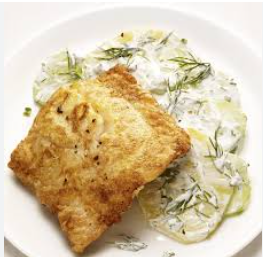
4 x 175g hake fillets, skin on and boned
1 tablesp. olive oil
Salt and freshly ground pepper
50g butter
½ lemon, pips removed
1 tablesp. chopped mixed herbs (parsley, chives and tarragon)
To Cook
Heat the olive oil in a large frying pan and add the seasoned hake fillets, skin side down. Cook for a couple of minutes until the skin is just beginning to crisp, then add little knobs of butter to the pan around each hake fillet and cook for another couple of minutes until the skin is crisp.
Turn the hake fillets over and cook for another 3-4 minutes until cooked through. This will depend on the thickness of the fillets. Transfer to warmed plates while you make the sauce.
Add the rest of the butter to the frying pan and allow it to gently melt over a moderate heat. When it has melted, add a squeeze of lemon juice and the herbs, swirling to combine. Season to taste. Spoon this sauce over the hake fillets and serve with steamed broccoli and some sautéed new potatoes.
Serving Suggestions
Steamed broccoli and sauté new potatoes
Tips
Above all be careful not to overcook the fish. To check, gently prod the thickest part of the fish with a small knife. If it is cooked, the flesh will look opaque and the flakes will separate easily. If it isn’t done yet, it will still have the translucent look for raw fish.
Other fish you could use: Whiting, haddock or trout fillets
My brother, Kenneth, loves Asian food and he is in no doubt that he is far better than me at cooking it! I don’t disagree. He is proud of this chicken satay dish and often makes it for the family. This dipping sauce also works well with pork, prawns, beef strips or turkey. And remember, kids just love anything on sticks!
SERVES 4
4 tbsp dark soy sauce
2 tsp clear honey
2 tsp medium curry powder
450g (1lb) skinless chicken breast fillets, cut into long strips
FOR THE PICKLED CUCUMBER SALAD:
4 tbsp rice wine vinegar
2 tbsp caster sugar
pinch of salt
½ small cucumber, peeled, halved, deseeded and thinly sliced
FOR THE DIPPING SAUCE:
2 tbsp crunchy peanut butter
2 tsp dark soy sauce
1 tsp light brown sugar
juice of ½ lime
1 x 160ml (5½fl oz) tin of coconut milk (Thai Gold, if possible)
½ red chilli, deseeded and finely diced
2 tbsp chopped fresh coriander
sea salt and freshly ground black pepper
1 To make the dipping sauce, place the peanut butter in a small pan and stir in the soy sauce, light brown sugar and lime juice. Gradually whisk in the coconut milk and heat gently until you have achieved a smooth sauce. Stir in the chilli and coriander, then leave to cool, stirring occasionally to prevent a skin from forming.
2 Soak 8 x 15cm (6in) bamboo skewers in a shallow dish of cold water for at least 30 minutes. Preheat a griddle pan until it’s smoking hot or light a barbecue.
3 Whisk together the soy sauce, honey and curry powder. Season with pepper and stir in the chicken pieces. Leave to marinate for 2 minutes, then thread the chicken pieces onto the soaked bamboo skewers and arrange on the barbecue. Cook the chicken skewers over medium-hot coals for 4–6 minutes, turning once or twice, until completely tender and cooked through. If using a griddle pan, reduce the heat to medium as soon as you’ve put the skewers on.
4 Meanwhile, to prepare the pickled cucumber salad, place the vinegar in a bowl and stir in the sugar and a good pinch of salt until both have dissolved. Tip in the cucumber, stirring to combine, and set aside to allow the flavours to develop. 5 To serve, arrange 2 chicken satay skewers on each warmed plate. Divide the dipping sauce among individual bowls and place to the side of the skewers. Add the pickled cucumber salad, leaving behind any excess liquid, to serve.
Butter Chicken
Swap your usual takeaway curry for this homemade chicken makhana, which combines marinated chicken with a rich, buttery sauce. This is an authentic Indian curry with its origins in Delhi, where it was first made to use up pieces of leftover tandoori chicken.
Serves 4–6
500g skinless and boneless chicken breasts or thighs
juice and finely grated rind of 1 lemon
3 tbsp mild curry seasoning
4 tbsp natural yogurt
3 tbsp sunflower oil
30g butter
2 red onions, thinly sliced
2 garlic cloves, sliced
1 red chilli, seeded
3cm piece fresh root ginger, peeled and sliced
20g fresh coriander
400ml passata (Italian sieved tomatoes)
120ml cream
sea salt and freshly ground black pepper
Trim the chicken and cut into bite-sized pieces. Put in a bowl and stir in half the lemon juice with a good pinch of salt. Add 2 tablespoons of the curry seasoning, the yogurt and 1 tablespoon of the oil. Mix to combine, then season generously with pepper. Cover and leave to marinate for at least 1 hour or up to 3 days in the fridge.
Heat the rest of the oil and a knob of the butter in a wok or skillet over a high heat, and quickly sear the marinated chicken in batches until golden brown, transferring with a slotted spoon to a clean bowl as you go. Add the onions to the pan and sauté for 4–5 minutes until they start to caramelise.
Tip in the garlic, chilli and ginger, then add another knob of the butter and sauté for 1–2 minutes. Chop the stalks from the coriander and add them to the pan with the rest of the curry seasoning and another knob of the butter. Toast for a few minutes until very fragrant. Pour the passata into the pan and bring to a simmer, then add the cream and the rest of the lemon juice.
Transfer to a blender and blend until you have a very smooth sauce. Return to the pan and add the chicken with any juices and reheat gently for about 5 minutes until the chicken is cooked through and tender. Season to taste, then fold in the lemon rind with the rest of the butter and the coriander leaves, reserving a few sprigs to garnish. Transfer to bowls and garnish with the coriander sprigs.
SERVE WITH … This mild and creamy curry is sure to please all tastes. Make some Homemade Flatbreads, perhaps brushing them with a little melted butter and sprinkling with black onion seeds. A bowl of Pilau Rice completes the meal, alongside some spiced mango chutney, mint raita and lime pickle.
‘Give your pancakes a French, Australian or American twist with Rachel Allen’s delicious recipes’
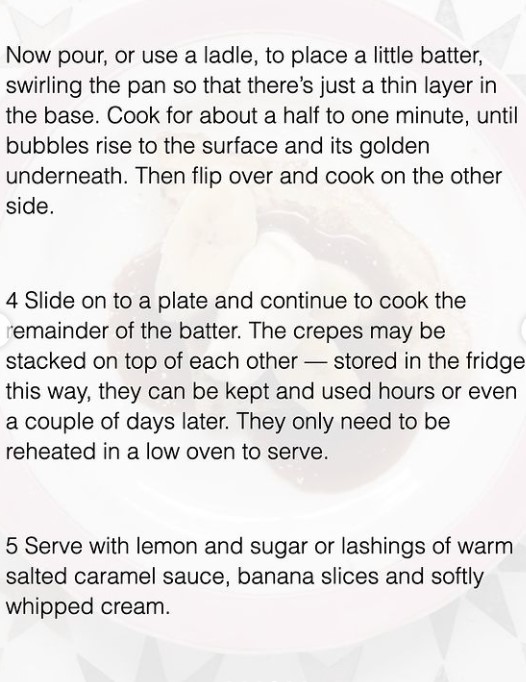
“If you’re looking for a new take on this age-old recipe, try a crepe with banana, salted caramel and cream, wholemeal pikelet with blueberry compote, American pancake with maple syrup and rashers, or buckwheat blini with salmon and creme fraiche
The cooking of pancakes dates way back to prehistoric times where batters made from stoneground flour and water were cooked over fire. Sometimes leavened with yeast and other raising agents, pancakes can take on many slightly dissimilar guises. Essentially flat cakes, pancakes in France are thin and sometimes a little crisp around the edges as the name crepe would suggest: like the thin fabric with a wrinkled surface. Serve with this salted caramel sauce recipe, below, as well as banana slices and softly whipped cream. Once made, the sauce will keep for a month or more. It gets thicker in the fridge so just reheat to serve.”


 dunnesstoresVerified