Odlums Fruit Cake. 🇮🇪☘️ So easy to bake 😋

Screenshot_2020-07-07 #odlums hashtag on Instagram • Photos and Videos

luv__to_bake_'s profile picture

Fruit Cake So easy to bake

350g of Raisins

350g of Sultanas 1

25g of Currants,

Tub of Cherries,

50g Chopped Almond Nuts,

2 teaspoons of Mixed Spice,

1 teaspoon of Ground Ginger,

Grated Rind Zest of 1 large Orange,

2-3 Tablespoons of Whiskey,

1 Tablespoon of Treacle

mix all together and leave for a couple of days .

500g of Plain Flour

2 teaspoons of baking powder,

350g butter,

350g of soft brown sugar,

6 eggs ,

Method
Cream butter and mix together the sugar , slowly beat in the eggs, and mix the sieve flour and baking powder, then mixed the fruit into the cream mixture, bake in 8inch round tin lined in baking paper and cover the outer tin in brown paper and bake for 3& 1/2 hours@ 140c #odlumsflour #odlums #bakingpowder #kerrygoldbutter #whiskey #whiteflour #rtéfood #raisons #sultanas #currants #cherries🍒 #treacle #margaretseggs #bbcgoodfoodrecipes #bbcgoodfood #bbcgoodfoodmagazine #almondnuts🌰 #orangerind #fruitcakes #teacakes #teacake #fruitcake🍰 #fruitcakes #rtefood #bakinglove #odlumsireland #christmascake

Breakfast muffins for Baby 🤤 @dunnesstores @babyledfeeding

https://www.instagram.com/reel/CnmKgPyK4Ur/?igshid=MDJmNzVkMjY=

dunnesstores

Verified

Follow

Liked by 

mcmanuspauline and others

  • dunnesstores's profile picturedunnesstoresVerified
  • Start yours and your baby’s day off right with these delicious and super nutritious breakfast muffins. Made using wholesome ingredients like carrots, apples, sunflower seeds, Greek yogurt and wholemeal flour, these muffins are the perfect breakfast finger food for your little one to enjoy in the morning.
  •  To serve to babies – Ensure you are always sitting with your baby when they are eating. Serve a mini muffin with a side of fruit. I like to use sliced pear, mango or strawberries.
  •  For older children serve 2 mini muffins or 1 large muffin in their lunchbox.
  • These muffins are perfect for school as they contain no sugar whatsoever!
  • The only sweetness comes from the delicious apple. You can make them even sweeter by adding a mashed banana to the mixture. @babyledfeeding

Sharon Hearne Smith’s Porridge Bread is SO easy to make! @RTEToday


By Sharon Hearne Smith

Food Stylist & Writer

More from
Today

Sharon Hearne Smith’s Sesame Seed Porridge Bread from Today with Maura and Dáithí.

Ingredients

This is an unusual bread recipe, based on porridge oats and yoghurt instead of flour and water. It is quick, easy and virtually foolproof to make.

Use any selection of seeds you prefer instead of sesame seeds, or omit them altogether for a plain bread. Alternatively, add other flavours like nuts and dried fruits or sundried tomatoes and basil or a swirl of pesto would be delicious too. This bread stays quite moist and fresh for a few days stored in an airtight container.

Makes: 1 loaf (about 12 slices)

  • Sunflower oil for greasing
  • 500g tub natural yoghurt
  • 100ml milk
  • 2 tbsp olive oil
  • 2 tbsp sesame seeds + extra for sprinkling
  • 2 tsp bicarbonate of soda
  • 2 x 500ml yoghurt tubs of porridge oats (or 400g)
  • butter for serving, optional

Method

  1. Preheat the oven to 200C (fan 180C), 400F, Gas Mark 6. Grease a 1Lb loaf tin (approximately 3 x 5 x 7 inch) with parchment paper and grease again.
  2. Scoop the yoghurt into a large bowl. Add the milk, oil, sesame seeds and bicarbonate of soda and mix until well blended.
  3. Fill a clean and dry yoghurt tub with oats and tip them in. Repeat with a second tub of oats. Alternatively, weigh out 400g of oats on a scales.
  4. Mix everything together until well blended.
  5. Spoon into the prepared tin, spreading the top level. Scatter a small handful of sesame seeds on top.
  6. Bake for 45 minutes or until golden brown and a skewer comes out clean when pierced in the middle.
  7. Remove from the tin and return the loaf to oven, directly on the shelf, for another 5 minutes to dry out the crust.
  8. Remove and leave to cool on a wire rack. Cut into slices and serve spread with a little butter if liked.

Clodagh McKenna’s Orange Pistachio Yogurt Cake @NDC_ie #homebaking

clodagh orange pistachio

Yields 8 Servings
Prep Time30 mins
Cook Time1 hr
Total Time1 hr 30 mins

This is one of my favourite cakes at this time of the year. It’s a much needed burst of sunshine. Deliciously light, and moist due to the natural Irish yogurt. You can make a gluten free version by simply using gluten free breadcrumbs. You can substitute the pistachios with hazelnuts, roast the hazelnuts before you add them to the cake, it enhances their flavour. It will last for one week, but not sure you will have any left for to test me on that!

To serve:

Decorate with 50g roughly chopped pistachios and the zest of one lemon on top. Serve with a dollop of natural Irish yogurt

Ingredients checklist
50 g slightly stale white breadcrumbs
100 g almonds, ground
100 g pistachios
1 tsp baking powder
4 eggs
150 g caster sugar
125 ml sunflower oil
200 ml natural Irish yogurt
zest of 1 orange
zest of 1 lemon
Ingredients checklist for the citrus syrup
juice of 1 orange
juice of 1 lemon
1 star anise
1 cinnamon stick

Instructions

Pre-heat the oven to 190°C / Gas 5.

Grease a 20.5cm (8in) round and 5cm (2in) deep tin and then lightly dust with flour.

In a large bowl mix together the breadcrumbs, almonds, pistachios and baking powder.

In a separate bowl whisk the eggs with the caster sugar. Continue to whisk while pouring in the vegetable oil, followed by the natural Irish yogurt.


Next stir the liquid pour into the dry ingredients and mix well. Add the orange and lemon zest.

Pour the mixture into the prepared cake tin and into the pre-heated oven.


Bake for 45 minutes to 1 hour or until the cake is golden brown. To ensure cake is done, insert a skewer into the center – if it’s ready, the skewer should come out clean. Allow to cool for 5 minutes before turning out onto a plate.


Meanwhile, make the citrus syrup. Put all of the ingredients into a saucepan and bring gently to the boil, stirring until the sugar has dissolved completely. Simmer for 10 minutes or until thick.


While the cake is still warm, pierce it several times with a skewer, then spoon the hot syrup over the cake, allowing it to run into the holes. Leave to cool. Spoon any excess syrup back over the cake every now and then until it is all soaked up.


Sprinkle chopped pistachios on top, and the zest of one orange. Serve with natural Irish yogurt

https://ndc.ie/recipe/clodaghs-orange-pistachio-yogurt-cake/


Jen Fox savoury oats #nationalporridgeweek #worldeggday


foxnestfood

Bacon & Cheese Savoury Oats (Trust me on this one!)

It’s National Porridge Week and I’m delighted to be teaming up with @flahavans to take on the “Bags Full of Potential” Challenge to showcase just how versatile Flahavan’s Oats are.

When you hear the word Porridge, most of us automatically picture a delicious steaming hot bowl, drizzled with honey & topped with fruit, but did you know that in Asia, savoury porridge oats are common place? It got me thinking, why it never took off in this part of the world?

I never had much of a sweet tooth and definitely prefer a breakfast that’s savoury so I decided to take influence from Asia’s savoury porridge but use some sharp Cheddar and Smokey Bacon. Trust me, It was incredibly delicious and it didn’t feel like it had to be breakfast anymore either. You could easily have this for lunch or dinner and it takes around 10 minutes!

What you need:
serve 2

* 80g Flahavan’s Porridge Oats
* 295ml of Chicken/Veg Stock
* 235ml Milk
* 70g Red Mature Cheddar, grated
* 100g Smoked Bacon Lardons
* Salt and Pepper to taste

Serve with:
* A Runny Seasoned Fried Egg
* Sliced Avocado
* Sautéed Spinach
* Chives, Chopped

What to do:

– Fry off the Bacon in a little oil until crisp, set aside
– In the same pot, add the Flahavan’s Porridge Oats, Stock/Water, the Milk & stir it up over medium heat until cooked
– Add the cheedar, return back the bacon and mix until cheese is melted (don’t forget to reserve some bacon to serve on top later)
– Season well with salt and black pepper to taste (add some butter if you’re feeling indulgent)
– Top with the seasoned fried egg, sliced avocado, sautéed spinach, crisp bacon and chives.
– Enjoy!

#flahavansporridge #bagsofpotential #flahavans #porridgeweek #oats #oatsforbreakfast #breakfastideas #easyrecipe #easyrecipes #quickrecipe #quickrecipes
Edited · 18h


Neven Maguire’s Apple Tart with Custard recipe @bordbia

Apple-Tart-with-Custard

From The Nation’s Favourite Food by Neven Maguire

Ingredients

Pastry

  • 225g plain flour, extra for dusting
  • 2 tbsp icing sugar
  • 100g butter, diced and chilled
  • 2 large egg yolks
  • 2-3 tbps ice-cold water

Filling

  • 900g Bramley cooking apples
  • 100g caster sugar
  • ¼ tsp ground cinnamon
  • Good pinch ground cloves/4 whole cloves
  • 1 tbsp milk

Custard

  • 5 egg yolks
  • 3 tbsp caster sugar
  • ½ vanilla pod, split in half and seeds scraped out
  • 300ml milk
  • 100ml cream

To Cook

To make the pastry: Sift the flour and icing sugar into a bowl. Using a round-bladed knife or the tips of your fingers, work in the butter and then mix in the egg yolks. Add the ice-cold water until the dough just comes together. Wrap in cling film and chill for at least 30 minutes.

Preheat the oven to 190°C (375°F/gas mark 5). Lightly dust the work surface with flour.

Divide the pastry into 2 portions, one slightly larger than the other, then roll out the larger piece until it is about 30cm in diameter. Use to line a 20cm pie dish or a 23cm flat plate, gently pressing into the corners. Trim the edges with a knife and reserve the excess for decorating. Place back in the fridge to chill while you prepare the apples.

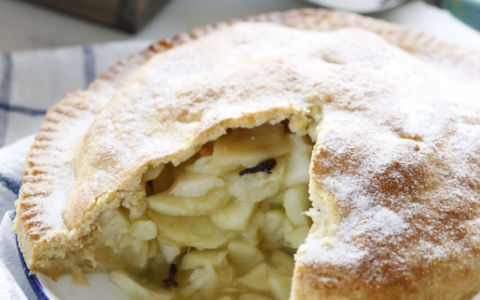
Peel, core and slice the apples. Place in a large bowl with all but 1 tablespoon of the caster sugar. Add the cinnamon and cloves and mix together. Brush the edge of the pastry with a little milk and then pile the apples into the lined pie dish. Roll out the second piece of pastry into a circle slightly larger than the pie dish and use to cover the apples. Press the edges together to seal, then use a sharp knife to cut away any excess.

Crimp the edges of the tart with a round-bladed knife, using your fingers as a guide. If you wish roll out the pastry scraps and cut into leaf shapes. Brush the shapes with milk and stick on top of the pie. Brush the entire top of the pastry with milk and sprinkle over the remaining 1 tablespoon of sugar. Bake for 25-30 minutes, then reduce the oven to 180°C (350°F/gas mark 4) and bake for another 20-25 minutes, until golden brown.

Meanwhile, to make the custard, place the egg yolks in a large bowl with the sugar and vanilla seeds. Whisk with an electric mixer for a few minutes, until pale and thickened.

Place the milk and cream in a medium pan and bring to the boil, then immediately remove from the heat. Gradually whisk the heated milk and cream into the egg yolk mixture until smooth, then pour back into the pan and place over a gently heat. Cook gently for 6-8 minutes on a medium heat, stirring constantly, until the custard coats the back of a wooden spoon. Keep warm.

Serving Suggestions

To serve, cut the warm apple tart into slices and arrange on warmed serving places with some of the custard. Pour the remaining custard into a jug and hand around separately.


http://www.bordbia.ie/consumer/recipes/desserts/pages/appletartwithcustard.aspx

.@rorysfood blackberry and sweet geranium posset #Ballymaloe

Watch How to Cook Well with Rory O’Connell at 8:30pm on Tuesday evenings on RTÉ One.

By Rory O’Connell Celebrity Chef
More from
How to Cook Well, with Rory O’Connell


Watch How to Cook Well with Rory O’Connell at 8:30pm on Tuesday evenings on RTÉ One.
Ingredients
A classic lemon posset or set cream is a simple and lovely thing and my version here with blackberries and sweet geranium leaves is I believe a good and delicious variation on the theme. It is remarkable how easy this is and how without the aid of egg or gelatine, the mixture sets into a tender chilled pudding. I like the possets served straight from the fridge, so nice and chilly. 
I often make this during the winter months using wild blackberries that I have frozen in the late summer or early autumn. If you are using frozen berries, use them straight from the freezer. I never cease to be amazed by the value one gets from a few bags of frozen fruit when fresh local fruit is simply not an option due to the seasons.  
A little softly whipped cream is the perfect accompaniment along with a fresh organic or crystallised rose petal. The combination of rose and blackberry is a marriage made in heaven and I might be tempted to add a few drops of rose water to the cream when whipping. Be careful though as too much rose water will yield a flavour that is too strong and overpowering. The flavour of the rosewater cream should be akin to catching the scent of a rose while walking about the garden – there but almost illusive.
If you do not have the lemon or rose-scented geranium, you can just leave it out. The fragrant leaves do however bring a magical element to the dish. The plants are easily found at good garden centres and can be treated as a house plant living on a bright window-sill or if the weather is mild where you live, they can spend spring, summer and autumn out of doors in a sheltered sunny spot. I can’t imagine not having one of these plants for the ravishing flavour to bring to certain dishes. In fact, it is the sort of magic that one receives from this rather innocuous looking leaf that humbles and mesmerises me and reminds me every time I use it, how astonishing nature is and how fortunate that my career has brought me down this path where I handle these treasures all of the time. Oh, joy.
The possets can be served in little cups or glasses or the prettiest receptacle you like to use. The portions are quite small as this is quite a rich little dish but I always think it is better to be longing for one more spoonful rather than being faced with too much food.
 A thin lacy biscuit such as the Nougatine biscuits would also be good here and I might be tempted to add a few drops of rose water to the cream when whipping. 
Serves
400ml cream
90g caster sugar
5 leaves of rose or lemon scented geranium
100g blackberries
50ml lemon juice.
Method
Place the cream, sugar, geranium leaves and blackberries in a small saucepan and bring to a bare simmer.
Stir the saucepan occasionally to encourage the sugar to dissolve. Maintain that bare simmer for 5 minutes. If the cream boils hard the texture and consistency of the posset will be spoiled. 
Remove the saucepan from the heat and stir in the lemon juice. You will notice the colour of the cream improving dramatically as soon as the lemon juice goes in.
Now strain the cream through a sieve to remove the geranium leaves and at the same time push as much of the blackberries through as possible. 
Pour the strained cream into 8 little cups or glasses and allow to cool before placing in the fridge for 3 hours to set.
The posset will keep perfectly in your fridge for several days. I like to cover them to protect the delicate flavour.
Serve with a little softly whipped cream and if you have them, a fresh or crystallised rose petal and a nougatine biscuit. 

Japanese milk bread – Shokupan @rachelallencooks #Ballymaloe

rachelallencooks

Verified

ballymaloecookeryschool and others

  • rachelallencooks's profile picturerachelallencooks
  • Happy Homemade Bread Day 🍞

    Japanese milk bread – Shokupan

    This is a Japanese tear-and-share loaf of bread with the most wonderful pillowy soft texture. It’s inspired by the Yudane and Tangzhong method where a little bit of flour and water or milk (both in this case) are cooked together to make a white sauce before mixing in the remaining ingredients. This method pre-gelatinises the starch in the flour allowing it to absorb more liquid, giving you a super-light loaf that stays fresh for longer as it retains the moisture.

    It also is divine with cinnamon, cardamom,dried fruit and/or candied peel added as a sweet treat.

    Here’s the recipe 👇🏽 below in Comments in 2 parts! Happy baking 🧡

    This bread can be made so easily using a Thermomix @thermomixukanireland
  • This quantity will make one 23 cm tear-and-share loaf.

    50g water
    50g milk
    15g strong white flour

    375g strong white flour
    15g milk powder
    25g caster sugar
    1 teaspoon salt
    115g milk
    1 egg, beaten
    25g fresh yeast or 12g dried yeast
    50g butter, melted

    Pour the water and the milk into a small saucepan and bring to the boil. Add in the 15g of flour & cook, whisking all the time, over the heat for a couple of minutes until the liquid has thickened to a white sauce. Tip the white sauce into a bowl & cool.
    Place the 375g of strong white flour in a mixing bowl, or the bowl of an electric food mixer (with the dough hook attached) ) with the milk powder, the sugar & the salt, & mix.
    Now place the milk in a separate bowl & add in the beaten egg, the yeast,the melted butter & the white sauce. Stir then pour all of this liquid into the dry ingredients & mix to a dough. Knead for 8-10 minutes by hand or in the machine until you have a smooth and almost springy dough, don’t add flour while you’re kneading, the dough is supposed to be slightly sticky. When I’m using a stand mixer for this I scrape down the sides of the bowl a couple of times during kneading.
    When the dough has been kneaded enough it will be smooth on the outside. Press it with a floured finger and the dent that you make with your finger should spring back a little bit.
    Place the dough into a bowl that’s large enough to take the dough when doubled in size (or leave it in the stand mixer bowl) & cover the bowl with a clean tea towel or a plate. Place it somewhere warm, not above 45’C, or just standing on the counter in your kitchen and allow the dough to double in size, this may take 2 hours. If you wish you can place the covered bowl of dough in the fridge overnight.
    When the dough has doubled in size, using a floured fist, punch the dough down to knock it back then knead it for just 1 minute.
    Brush a 23cm spring-form tin with melted butter, then dust with flour.
    Divide the dough into 8 equal pieces, each weighing about 90g. Keep all dough covered with a clean tea towel while you work with one ball of dough. On a very lightly floured work surface, place one ball of dough.2 likesReply
  • rachelallencooks's profile picturerachelallencooksVerifiedOn a very lightly floured work surface, place one ball of dough. Fold the edges, all the way round, into the centre of the ball of dough, squashing it down in the centre as you go. Turn the ball over so that the folded side is on the underside and the smooth side is on top. Roll the ball gently under the palm of your hand to make a round roll then place into the prepared tin. Repeat with all the other balls of dough so that you end up with 7 around the sides, spaced apart, and one ball in the centre. Now cover with the tea towel again and place on the worktop or somewhere a little warmer, again not above 45’C , and allow to rise again until almost doubled in size, about 35-45 minutes.
    Preheat an oven to 200’C. The dough is ready when you make a little dent with a floured finger and it doesn’t spring back. Also, the balls of dough should have joined together at this stage. Whisk the egg with a pinch of salt and brush very gently over the top of the risen bread. Place the bread in the lower part of the preheated oven to bake for 30-40 minutes. The dough, out of the tin, should sound hollow when you tap it on the base. If you wish you can bake the bread out of the tin for the last 5 minutes of cooking time. Place on a wire rack to cool.2 likesReply
  • leanwithlesleyLooks delicious, reminds me of your ciabatta/tabata 😂❤️Reply
  • View replies (1)

Cherry Almond Galette @KerrygoldUSA #foodaware

A classic combo, with a crunch. This Cherry Almond Galette is a must try. kerrygoldusa.com/grazings/cherr

Ingredients For the pie dough

1-1/4 cups (175 gm) all-purpose flour

1 teaspoon sugar

½ teaspoon salt

½ cup (113 gm) cold

Unsalted Butter

¼ cup ice water

For the filling

¾ cup (90 gm) almond meal

½ cup (100 gm) sugar, divided

1 teaspoon vanilla

1 large egg, beaten

4 cups (1-1/4 lbs) stemmed, pitted, and halved cherries

1-1/2 tablespoons cornstarch 1 tablespoon Grand Marnier or bourbon

1 teaspoon orange zest, optional

1 tablespoon turbinado sugar, optional

2 tablespoons sliced almonds, optional

To prepare the dough:

  1. Combine the flour, sugar, and salt in a large bowl. Use a pastry cutter to cut the Kerrygold butter into the dry ingredients until they are reduced to pea-sized clumps.
  2. The remainder of the mixture should look like a sandy consistency. Pour in the ice water and use the pastry cutter or a large fork to bring the dough together into a shaggy mixture.
  3. Then dump the contents of the bowl out onto a clean counter and work it into a ball of dough. Do not overwork the mixture.
  4. Flatten out the ball into a disk and wrap in plastic wrap.
  5. Place in the fridge to chill for at least two hours and up to a week.

To prepare the galette:

  1. Preheat the oven to 375 degrees.
  2. Place a piece of parchment paper on a sheet pan.
  3. Combine the almond meal, ¼ cup sugar, vanilla, and half of the beaten egg in a small bowl into a pasty consistency.
  4. In a separate bowl, combine the cherries, remaining ¼ cup sugar, cornstarch, booze, and zest. Set aside.
  5. Use a floured rolling pin to roll the dough out onto a floured surface into a 12” circle.
  6. Spread the almond mixture in the center of the circle, leaving a 2” border around the perimeter of the circle.
  7. Dump the cherry mixture on top of the almond filling. Fold the edges of the pie dough up and over the cherries, gently pressing the dough to seal on top of itself as you fold.
  8. Use a pastry brush to brush a thin layer of the remaining beaten egg on top of the dough.
  9. Sprinkle the dough with the turbinado sugar and sliced almonds.
  10. Bake in the preheated oven for about 40-45 minutes or until the crust is golden and the filling is bubbling.
  11. If you notice you crust is getting dark and the inside juices aren’t bubbling at all you can make a little aluminum foil shield to cover the dough around the perimeter of your galette.
  12. Allow to cool and set prior to slicing and serving with ice cream!

CHERRY ALMOND GALETTE

Raspberry Heart Galette for Christmas, Valentine’s or anytime

We’re all loved up on Raspberry Heart Galette! Valentines or galentines? This recipe covers all bases!

Difficulty Beginner

Category

Christmas

Fruit Type Raspberries

Prep Time25 mins

Cook Time30 minsT

Total Time55 mins

Ingredients

375 g Keeling’s raspberries3 punnets

1 tbsp caster sugar

Squeeze of lemon

1 packet of shortcrust pastrythawed if bought frozen

1 tbsp flour

1 eggbeaten

Handful flaked almonds

Directions

1

Place raspberries in a medium sized bowl then sprinkled over caster sugar and squeeze over some lemon juice. Stir with a fork so that some of the raspberries are broken up, but still maintaining plenty of whole ones. Set aside.

2

Pre-heat the oven to 200°C / 180°C fan assisted and place a flat baking sheet or overturned tray in the oven to pre-heat.

3

Roll out chilled shortcrust pastry on a floured surface to about 5mm thick then transfer to a baking tray lined with parchment paper. Using a sharp knife, cut the pastry into a large heart, discarding the trimmed pieces of pastry.

4

Sprinkle the flour over the middle of the pastry, this will help thicken the juices while baking, then tip out the raspberries on top and spread out over the pastry in an even layer, but keep a 4-5cm border around the edges.

5

Fold the pastry border up and over the filling, shaping the galette into a heart as you fold the edges over, until you’re back where you started, crimping the pastry together where the folds meet to help them stick.

6

Brush the pastry border with beaten egg and sprinkle with flaked almonds.

7

Place the tray directly on top of the hot tray already in the oven and bake until pastry is golden, 30-35 minutes.

8

Remove from the oven and leave to stand for about 5-10 minutes before serving with scoops of ice-cream or dollops of whipped cream while still warm.