1 packet of shortcrust pastrythawed if bought frozen
1 tbsp flour
1 eggbeaten
Handful flaked almonds
Directions
1
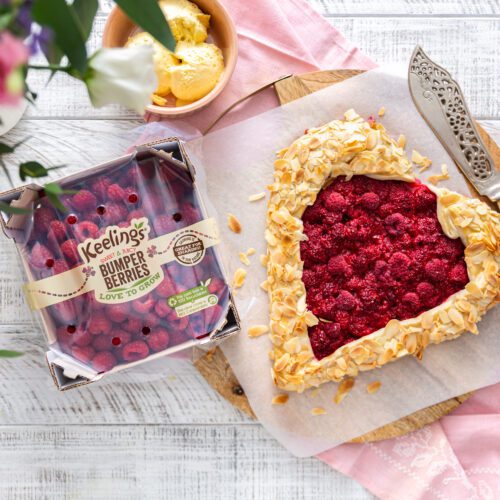
Place raspberries in a medium sized bowl then sprinkled over caster sugar and squeeze over some lemon juice. Stir with a fork so that some of the raspberries are broken up, but still maintaining plenty of whole ones. Set aside.
2
Pre-heat the oven to 200°C / 180°C fan assisted and place a flat baking sheet or overturned tray in the oven to pre-heat.
3
Roll out chilled shortcrust pastry on a floured surface to about 5mm thick then transfer to a baking tray lined with parchment paper. Using a sharp knife, cut the pastry into a large heart, discarding the trimmed pieces of pastry.
4
Sprinkle the flour over the middle of the pastry, this will help thicken the juices while baking, then tip out the raspberries on top and spread out over the pastry in an even layer, but keep a 4-5cm border around the edges.
5
Fold the pastry border up and over the filling, shaping the galette into a heart as you fold the edges over, until you’re back where you started, crimping the pastry together where the folds meet to help them stick.
6
Brush the pastry border with beaten egg and sprinkle with flaked almonds.
7
Place the tray directly on top of the hot tray already in the oven and bake until pastry is golden, 30-35 minutes.
8
Remove from the oven and leave to stand for about 5-10 minutes before serving with scoops of ice-cream or dollops of whipped cream while still warm.
The name of this simple dessert comes from the Italian tirami su, meaning ‘pick me up’ (or ‘cheer me up’). Tiramisu has been subjected to many variations over the years, but this is the original recipe and – in my opinion – the best! This is a dessert that actually benefits from being made ahead, allowing the lovely flavours to mingle. As a result, it is perfect for a large gathering.
Serves 8–10
4 large eggs
100g caster sugar
250g mascarpone cheese 2
50ml cream
250ml freshly brewed strong espresso coffee (left to cool completely)
150ml Tia Maria or Kahlúa liqueur
40 sponge fingers
50g bar plain chocolate
2 tsp cocoa powder
Separate the eggs, putting the yolks in one bowl with 80g of the sugar, and the egg whites in another. Using an electric beater, whisk the egg yolks and sugar until pale and creamy, then mix in the mascarpone cheese until well combined. Whip the cream in a separate bowl until soft peaks form, then fold into the egg yolk and mascarpone mixture.
Using spotlessly clean beaters, whisk the egg whites with 20g of sugar until soft peaks form, then fold this into the mascarpone cream. Spoon a third of this mixture into a suitable dish that is at least 2cm deep. Pour the coffee into a shallow dish and stir in the Tia Maria or Kahlúa. Dip in enough of the sponge fingers to make an even layer on top of the mascarpone mixture. Only dip the sponge fingers in as you go along, so they don’t soak for too long and become difficult to handle.
Cover the layer of soaked sponge fingers with another third of the mascarpone mixture, then grate most of the chocolate bar on top using the coarse side of a grater. Add another layer with the rest of the soaked sponge fingers, then spoon over the remaining mascarpone mixture and spread evenly with a back of a spoon. Cover with cling film and chill overnight to allow the flavours to develop and the dessert to settle. To serve, give the tiramisu a good dusting of cocoa powder, then grate over the rest of the chocolate. Place in the middle of the table so that everyone can help themselves.
SERVE AFTER … A go-to dessert if you like spoiling your guests after a long Italian-inspired meal. Tiramisu is ideal for the warmer months since it can be made well in advance and kept in the fridge until needed.
Pavlova Wreath with Exotic Fruit
Cakes are always the sweet option of choice for birthdays and anniversaries. However, I would like to introduce to you the Pavlova Wreath – it is very pretty and easy to make, and it delivers an incredible flavour. As always, feel free to use your own favourite combination of flavours to personalise it. Be sure to produce it with a flourish for that ‘ta-da’ moment!
Serves 10–12
For the meringue
5 egg whites
250g caster sugar
50g icing sugar
2 tsp cornflour
For the raspberry sauce
200g raspberries
2 tbsp icing sugar
1 tbsp lime juice
2 tsp cornflour or arrowroot
For the crème Chantilly
200ml cream (well chilled)
1 tsp vanilla extract
40g icing sugar
To decorate
200g raspberries
400g tin lychees, well drained and cut in half
2 passion fruit, halved and seeds scooped out
Preheat the oven to 140°C (275°F/Gas Mark 1). Put the egg whites into the bowl of a stand mixer. Turn on to a medium speed and whisk until they begin to go frothy and hold their shape a little. Mix the caster and icing sugar together, then add about one third to the eggs in a steady stream, whisking all the time on medium to high. The mixture will now begin to thicken a little.
Make sure that all the sugar has dissolved before you add any more. Add the next third and repeat the process, whisking it all up well. Then add the final third of the sugar. Whisk on high now, since the egg mixture will be much more stable. Keep whisking until you reach the stiff-peak stage. Add the cornflour and fold in with a spoon. Draw a 25cm circle on a piece of parchment paper and use it to line a large baking sheet, then draw a 10cm circle in the middle. This is your stencil. Put dollops of the meringue mixture on to the wreath stencil, keeping it within the edges.
Bake for 55–60 minutes until the meringue has just a little colour. Remove it from the oven and leave to cool. Meanwhile, make the raspberry sauce. Blitz the raspberries in a food processor with the icing sugar and lime juice, then pass through a sieve into a small pan using a plastic spatula. Mix the cornflour or arrowroot with one tablespoon of water until smooth, then add this to the raspberries. Bring to the boil over medium to high heat, then simmer gently for a few minutes until thickened, stirring occasionally.
Set aside to cool. For the crème Chantilly, whisk up the cream, vanilla and sugar in a bowl until it is just beginning to hold soft peaks. Cover with cling film and chill until needed. Carefully slide your Pavlova wreath on to a large, flat serving plate. Place dollops of the crème Chantilly around the top of the wreath, then drizzle over some of the raspberry sauce; the rest can be served in a jug at the table. Decorate the wreath with the raspberries, lychees and passion fruit pulp. Serve straight away.
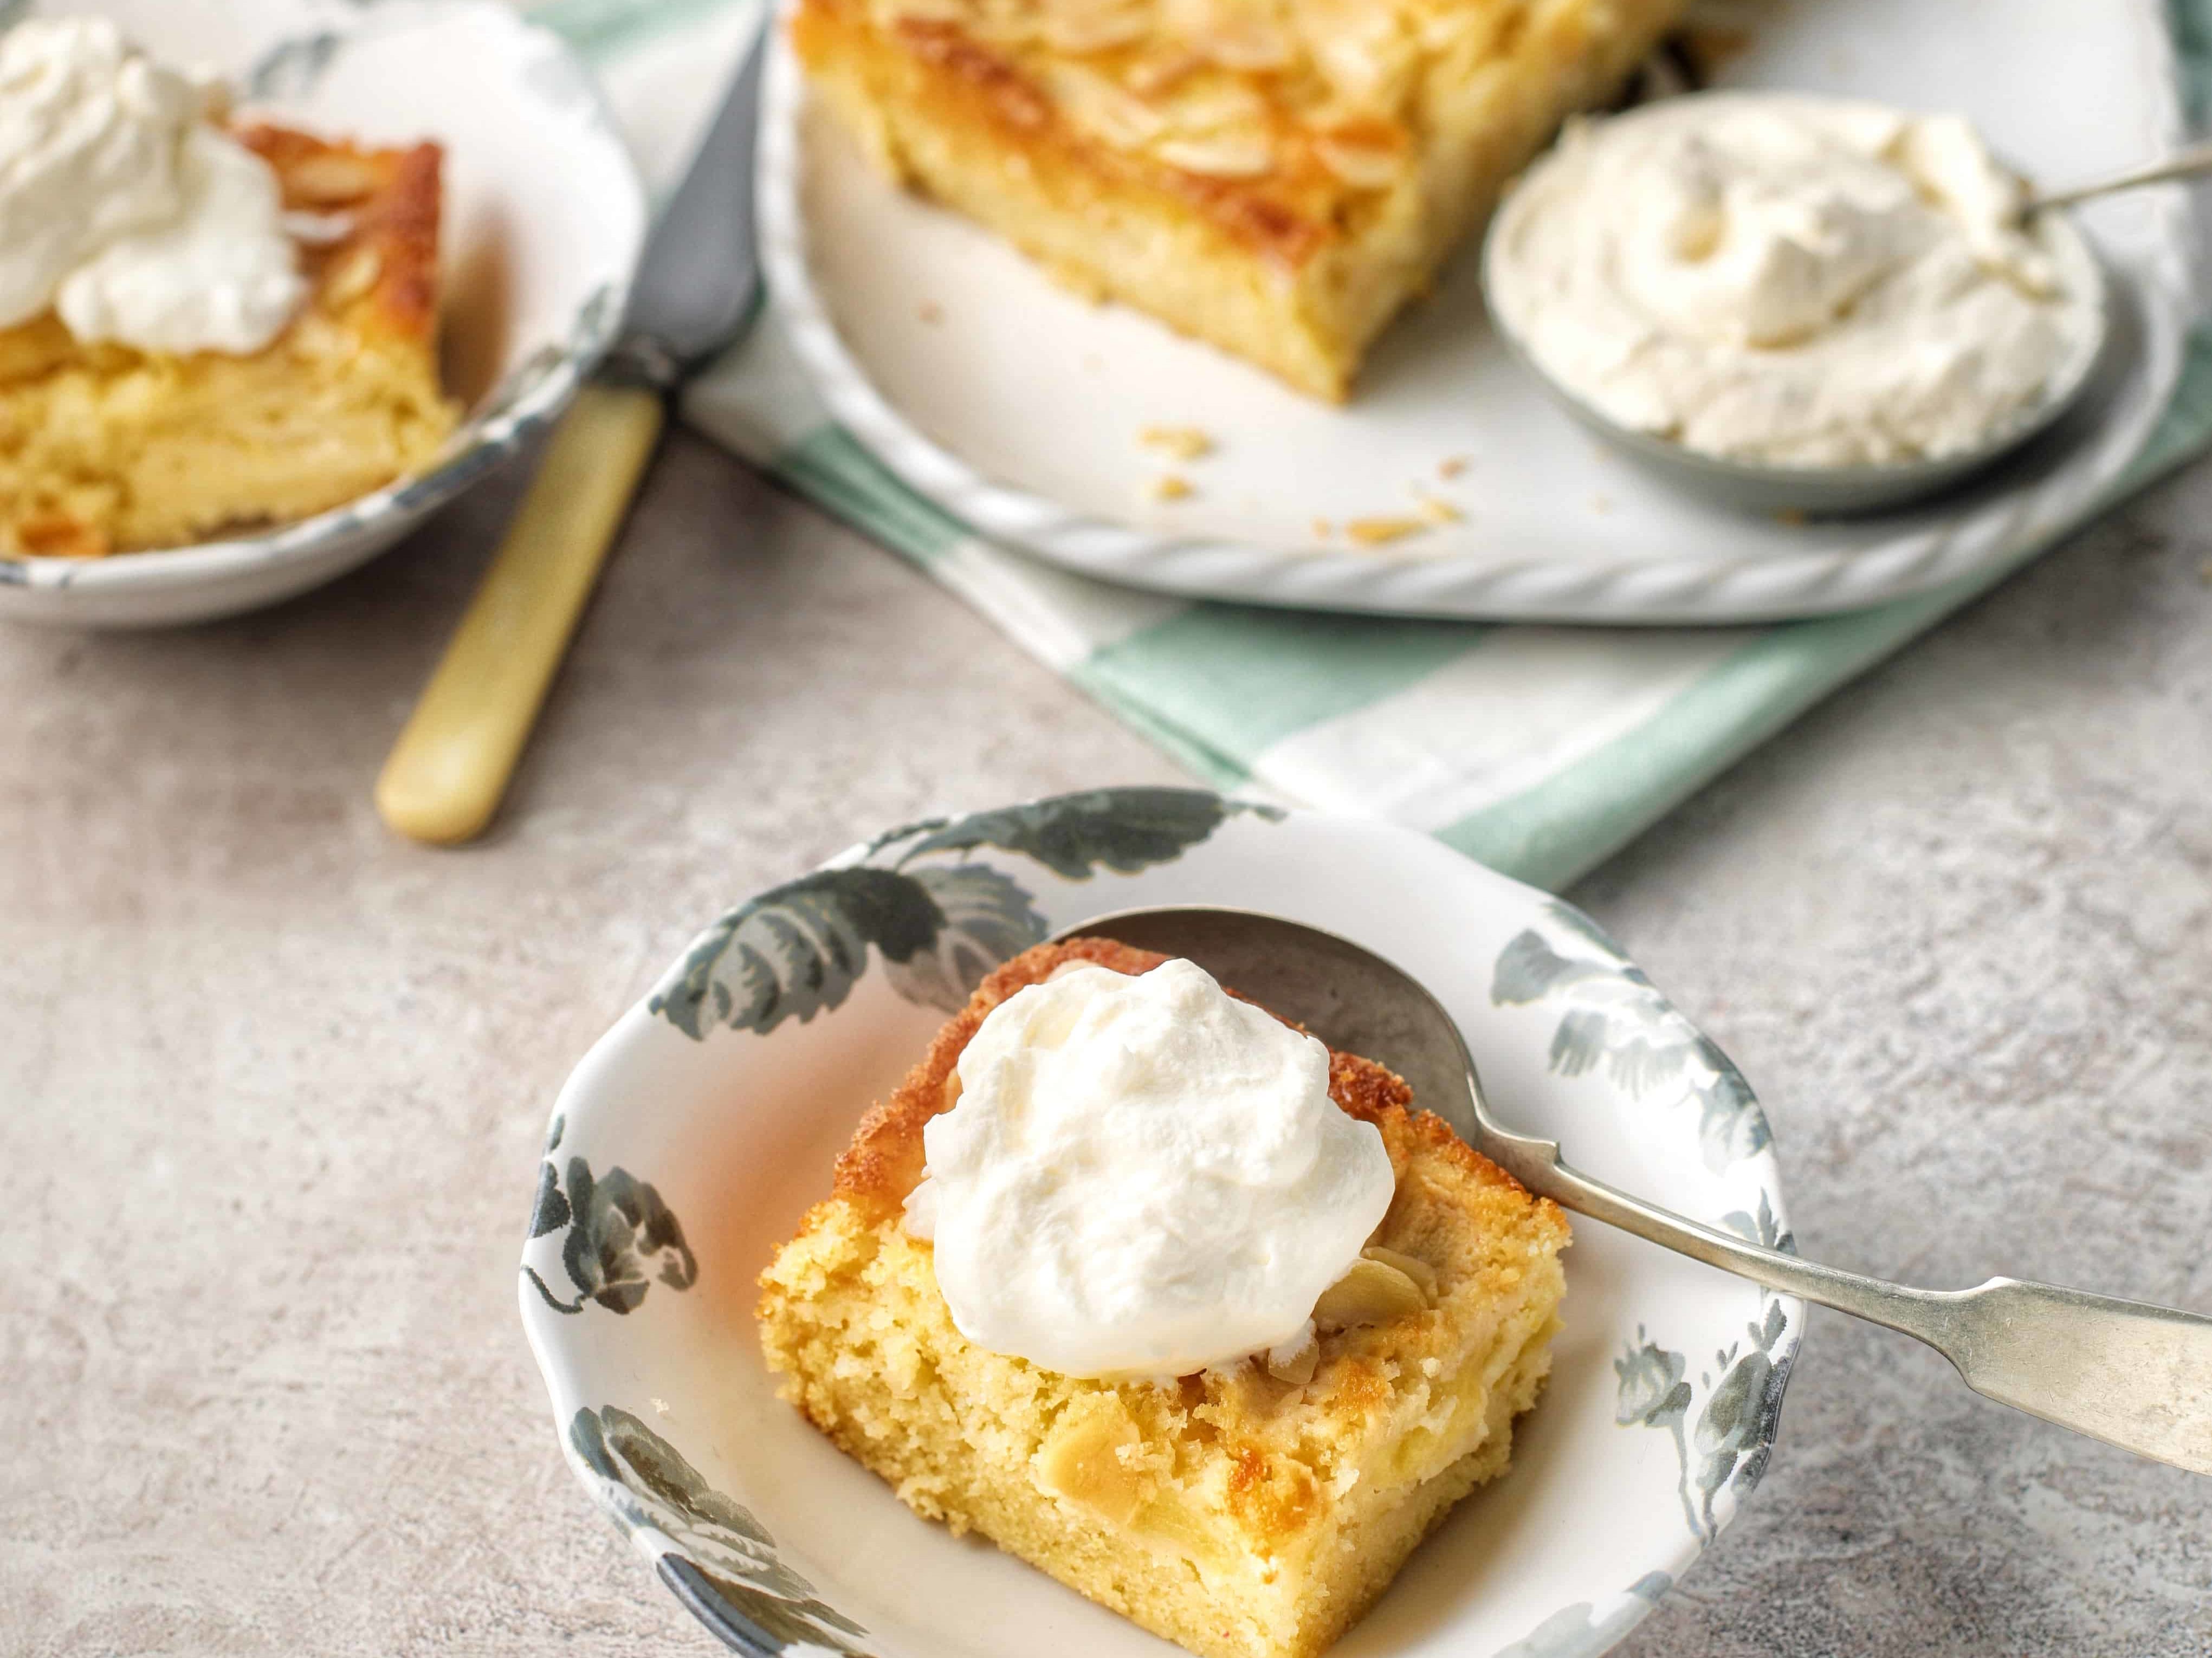
I am never quite sure if I should be calling this a cake or a tart but in any event, it is delicious and quite easy to make.
Ingredients
I am never quite sure if I should be calling this a cake or a tart but in any event, it is delicious and quite easy to make.
The origins of the recipe are from Tuscany in Italy but I like to use highly perfumed Irish dessert apples when in season. Look out for some lesser known but very delicious Irish dessert apples such as Irish Peach and Ardcairn Russet.
Serves 8
10g butter melted for greasing the parchment paper
4 dessert apples
Finely grated zest of 2 lemons
1 teaspoon vanilla extract
250g caster sugar
2 eggs
150ml cream
110g butter melted and cooled
125g whole almonds, blanched, peeled and ground to a fine powder in a food processer or ground almonds
110g plain flour sieved
1 ½ teaspoons baking powder sieved
100g of apricot jam
1 tablespoon lemon juice, warmed and sieved
2 tablespoons of chopped sweet geranium leaves ( optional)
Method
Preheat the oven to 180c / 350 f / gas 4
Line a 28cm flan ring with a removable base with a disc of parchment paper. The paper should in one piece cover the base and sides of the tin and come up 1cm above the edge of the tin. Brush the paper with a little melted butter.
Peel, core and quarter the apples and slice into c 3mm slices. Mix with the lemon zest. Whisk the vanilla, sugar, and eggs to a thick and light consistency similar to a batter. Whisk in the cream and cooled melted butter. Fold in the almonds, flour and baking powder. Add ¾ of the sliced apples, being careful not to break the apple slices.
Pour the mixture into the prepared flan ring and gently smooth over the surface. Scatter the remaining apples over the surface and sprinkle with 1 dessertspoon of caster sugar.
Place in the preheated oven and cook for 20 minutes. Reduce the temperature to 160c etc and cook for a further 40 minutes by which time the tart will feel gently set. It may be necessary to cover the tart during the cooking with a sheet of parchment paper if the tart is getting too dark.
Remove from the oven and allow to cool slightly. While the tart is still warm, Paint the surfaced with the warm sieved apricot jam to achieve a glossy glaze and if using the chopped geranium, sprinkle on immediately after glazing the tart.
Put the tofu, ground star anise, vanilla seeds, treacle and agave syrup into a large bowl and blend with a hand blender until silky smooth.
Melt the chocolate in a heatproof glass bowl sat over a saucepan of simmering water, being careful not to let the bowl touch the water. Fold into the tofu. Spoon the mixture between 4 glasses and refrigerate until set.
To make the honeycomb, line a baking tray with baking paper. Put the sugar, glucose and golden syrup into a deep saucepan and heat until it reaches 145C. (This should take about 5 minutes). Quickly whisk in the bicarbonate of soda. Be careful as the mixture will bubble up very suddenly. Quickly pour onto the lined baking tray. Set aside to cool and harden.
To make the apricots, heat the oil in a frying pan. Add the apricots and star anise and cook until the apricots start to caramelise. Sprinkle over a pinch of sugar and leave to cool.
To serve, sprinkle the toasted almonds on top of the mousse and serve with the apricots and peices of honeycomb.
Granulated Sugar (depending on sweetness of apples)
How to:
Preheat oven to 180°C/350°F/Gas 4. Lightly grease an ovenproof dish about 28cms x 18cms (11″ x 7″).
Cream together the butter or margarine and icing sugar until light and fluffy.
Beat in the eggs one at a time. Stir in the lemon rind.
Sieve flour and baking powder. Add the flour to the batter, alternately with the milk.
Spread half the mixture into prepared dish, layer half the apples over this and top with remaining mixture. Arrange the apple slices on top. Sprinkle with sugar if wished and finally sprinkle over the flaked almonds.
Bake for about 40 minutes until well risen and firm to the touch.
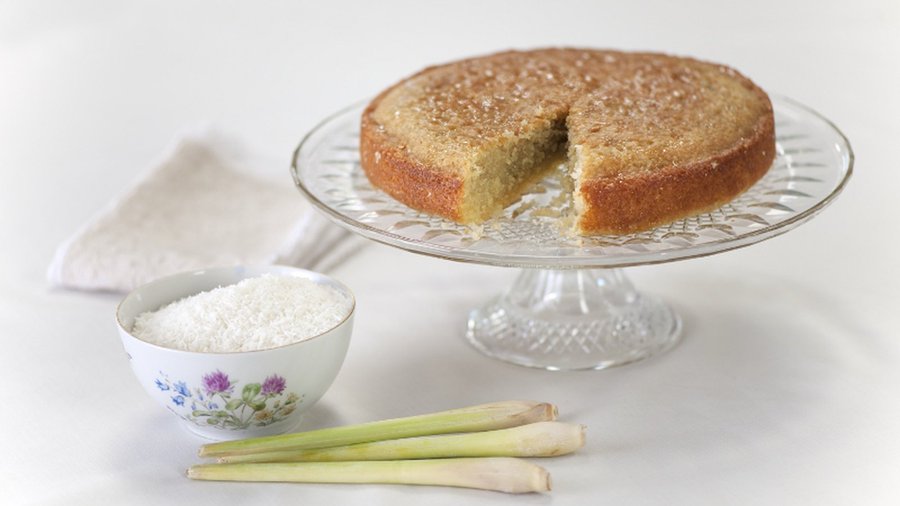
A quirky combination. The end result? A scrumptious cake for all to enjoy. Ingredients 4 stalks of lemongrass, base and tops trimmed, outer leaves removed but reserved for the syrup (see below) 250 g (9oz) caster sugar 4 eggs 200 g (7oz) butter, softened, plus extra for greasing 125 g (41/2 oz) desiccated coconut 125 g (41/2 oz) plain flour, plus extra for dusting 2 tsp baking powder greek yoghurt or creme fraiche, to serve for the syrup reserved trimmings and outer leaves of the lemongrass (see above) 75 g (3oz) caster sugar 23cm (9in) diameter cake tin with 6cm Method Preheat the oven to 170°C (325°F/Gas 3). Butter the sides of the cake tin and dust with flour, then line the base with a disc of baking parchment. Slice the lemongrass stalks quite thinly into rounds about 3mm (1?8in) thick, then place in a food processor with the caster sugar and whiz for 1–2 minutes or until the lemongrass is finely puréed and very aromatic. Add the eggs, butter and coconut and whiz again until combined, then sift the flour and baking powder together and add to the machine, whizzing very briefly just until the ingredients come together. Tip the mixture into the prepared tin and bake for 40–45 minutes or until a skewer inserted into the centre of the cake comes out clean. While the cake is cooking, make the syrup. Roughly chop the lemongrass trimmings, place in a saucepan with the sugar and 75ml (3fl oz) of water and set over a high heat. Stir the mixture until the sugar is dissolved, then bring to the boil and boil for 2 minutes before removing from the heat and leaving to infuse. When the cake has finished baking, take it out of the oven and let it sit in the tin for 10 minutes. Loosen around the edges using a small, sharp knife and carefully remove the cake from the tin before transferring to a serving plate. Reheat the syrup, then pierce holes all over the cake with a skewer and pour the hot syrup through a sieve onto the cake, moving the pan and sieve around as you pour so that the syrup covers the top of the cake. Allow the cake to cool down completely. Serve with a dollop of natural Greek yoghurt or crème fraiche.
A delicious classic recipe for a very classy cake.
Ingredients
butter (melted, for greasing)
4 eggs
125 g (41/2 oz) caster sugar (plus 3 tbsp for sprinkling)
2 tblsp warm water
1 tsp vanilla extract
125 g (41/2 oz) plain flour (plus extra for dusting)
for the filling
200 g (7oz) rhubarb (about 2 stalks, trimmed), cut into 5mm (1/4 in) slices
125 g (41/2 oz) caster sugar
200 ml (7fl oz) milk
1 vanilla pod, split lengthways, or 2 tsp vanilla extract
3 egg yolks
15 g (1/2 oz) cornflour
100 ml (31/2 fl oz) whipped double or regular cream (measured when whipped)
Method
Preheat the oven to 190°C (375°F/Gas 5). Line the base of the Swiss roll tin (25 x 38cm/ 10 x 15′) with baking parchment, brush the base and sides of the tin with melted butter and dust with flour.
Using a hand-held electric beater or an electric food mixer, whisk together the eggs, caster sugar, water and vanilla extract until light and fluffy.
Sift in the flour, about one-third at a time, and fold it into the mixture. Carefully pour the mixture into the prepared Swiss roll tin and bake in the oven for 12–15 minutes or until the centre of the sponge is slightly springy to the touch and the edges have shrunk a little from the sides of the tin.
Take a piece of baking parchment slightly larger in size than the tin and spread out on a work surface.
Sprinkle the paper evenly with caster sugar (this is to stop the cake sticking to the paper). Quickly flip the Swiss roll tin over onto the sugared paper, then carefully remove the tin and baking parchment from the bottom of the cake.
Place a clean, slightly damp tea towel over the cake while it cools – this will prevent it drying out and cracking when you roll it.
Meanwhile, make the filling. Place the rhubarb in a saucepan with 75g (3oz) of the caster sugar and 25ml (1fl oz) of water and place on a medium heat, stirring to dissolve the sugar. Bring to the boil and allow to boil, uncovered and stirring regularly, for 10–15 minutes or until the rhubarb is completely soft and the mixture is quite thick.
Tip out onto a plate and allow to cool.
Next make the custard. Place the milk and the split vanilla pod (if using) in another pan and bring to the boil.
Whisk the egg yolks (and vanilla extract, if using) with the remaining sugar (I like to use a hand-held electric beater for this) for a few minutes or until pale and light. Then briefly whisk in the cornflour.
Pour the hot milk and vanilla pod (if using) onto the egg mixture, whisking as you pour, then tip it all back into the saucepan and cook, stirring all the time, over a low heat for a few minutes or until it forms a thick custard.
Pour it into a bowl and allow to cool, then fold in the cooled rhubarb and the whipped cream – you can leave it slightly marbled (not fully mixed) if you prefer.
When the sponge is completely cold, spread over the rhubarb and custard mixture, then, with one of the short sides facing you, roll up the Swiss roll away from you and carefully transfer to a serving plate.
Sprinkle with a little extra caster sugar to finish, then cut into slices about 2cm (3/4in) thick to serve.
Granulated Sugar (depending on sweetness of apples)
How to:
Preheat oven to 180°C/350°F/Gas 4. Lightly grease an ovenproof dish about 28cms x 18cms (11″ x 7″).
Cream together the butter or margarine and icing sugar until light and fluffy.
Beat in the eggs one at a time. Stir in the lemon rind.
Sieve flour and baking powder. Add the flour to the batter, alternately with the milk.
Spread half the mixture into prepared dish, layer half the apples over this and top with remaining mixture. Arrange the apple slices on top. Sprinkle with sugar if wished and finally sprinkle over the flaked almonds.
Bake for about 40 minutes until well risen and firm to the touch.
100g dried apricots, chopped in the food processor
3 Quality Assured large eggs, beaten
Oranges in caramel
4 large oranges, peeled and sliced
4 tablesp. sugar
125ml water
To Cook
Set oven 180°C (350°F) Gas Mark 4.
Line a shallow 23cm cake tin with baking parchment.
Beat the butter and sugar together, until light and fluffy, add the lemon juice and ground almonds. Fold in the flour, apricots and eggs. Transfer the mixture to the lined cake tin, smooth the top and bake for approx. 35 mins., until firm to the touch.
Oranges in Caramel
Place the oranges in a flat dish, heat the sugar in a heavy pan, allow the sugar to brown add the water and boil until you have a caramel sauce. Pour it over the oranges. Serve with the cake.