Dr Sarah Brewer Retweeted

Always good when #RecipeOfTheDay is Chocolate Pear Pudding! https://www.nigella.com/recipes/chocolate-pear-pudding …

Nutrition key to sound health
Always good when #RecipeOfTheDay is Chocolate Pear Pudding! https://www.nigella.com/recipes/chocolate-pear-pudding …
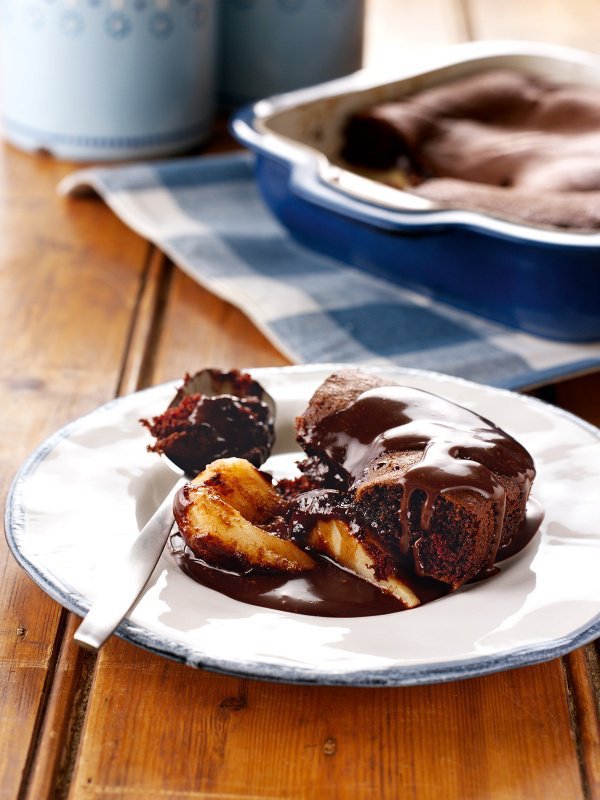
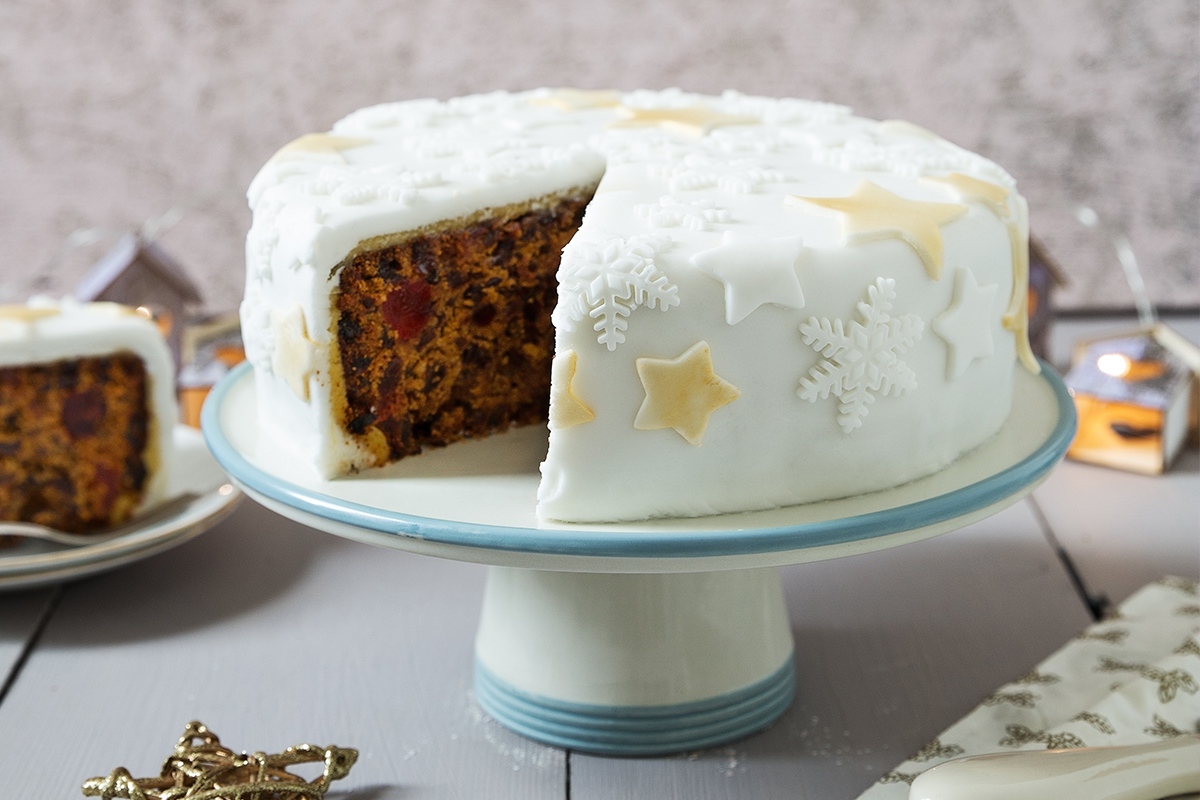
Makes 2x 1.2 litre (2 pint) puddings
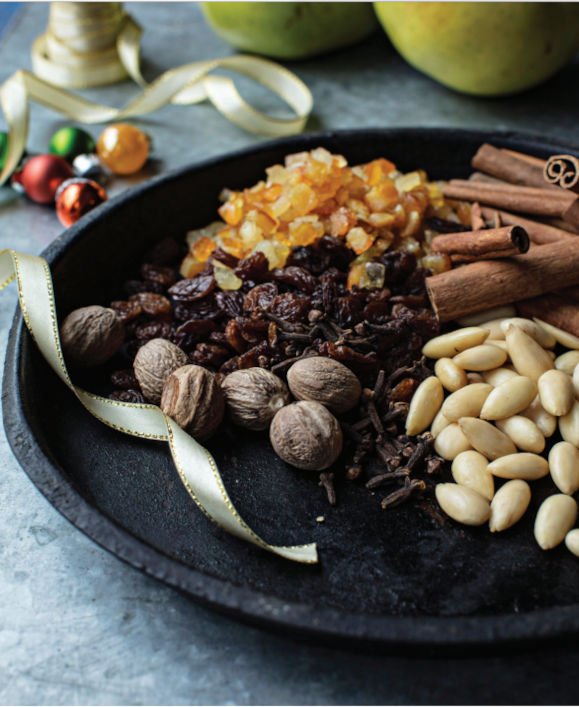
Nothing beats the flavour of homemade Christmas pudding, but it’s important to get good-quality fruit and it’s best made at least 1 month in advance.
I love plum pudding, hot or cold, with lashings of cream, but the spiked almond custard is even more special. I always look forward to it. A big thank you to Auntie Maureen for this recipe.
https://www.instagram.com/reel/CsbKXWpM6ms/?igshid=MTc4MmM1YmI2Ng==

•
Follow
Liked by rose_anne_murray and others
 simplybetterds
Makes 2x 1.2 litre (2 pint) puddings
Nothing beats the flavour of homemade Christmas pudding, but it’s important to get good-quality fruit and it’s best made at least 1 month in advance.
I love plum pudding, hot or cold, with lashings of cream, but the spiked almond custard is even more special. I always look forward to it. A big thank you to Auntie Maureen for this recipe.
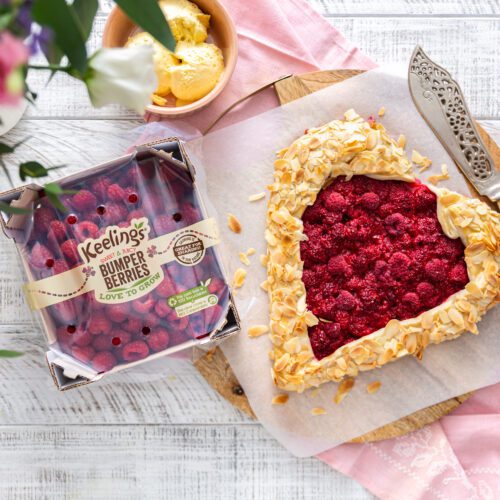
We’re all loved up on Raspberry Heart Galette! Valentines or galentines? This recipe covers all bases!
Category
Fruit Type Raspberries
Prep Time25 mins
Cook Time30 minsT
Total Time55 mins
375 g Keeling’s raspberries3 punnets
1 tbsp caster sugar
Squeeze of lemon
1 packet of shortcrust pastrythawed if bought frozen
1 tbsp flour
1 eggbeaten
Handful flaked almonds
1
Place raspberries in a medium sized bowl then sprinkled over caster sugar and squeeze over some lemon juice. Stir with a fork so that some of the raspberries are broken up, but still maintaining plenty of whole ones. Set aside.
2
Pre-heat the oven to 200°C / 180°C fan assisted and place a flat baking sheet or overturned tray in the oven to pre-heat.
3
Roll out chilled shortcrust pastry on a floured surface to about 5mm thick then transfer to a baking tray lined with parchment paper. Using a sharp knife, cut the pastry into a large heart, discarding the trimmed pieces of pastry.
4
Sprinkle the flour over the middle of the pastry, this will help thicken the juices while baking, then tip out the raspberries on top and spread out over the pastry in an even layer, but keep a 4-5cm border around the edges.
5
Fold the pastry border up and over the filling, shaping the galette into a heart as you fold the edges over, until you’re back where you started, crimping the pastry together where the folds meet to help them stick.
6
Brush the pastry border with beaten egg and sprinkle with flaked almonds.
7
Place the tray directly on top of the hot tray already in the oven and bake until pastry is golden, 30-35 minutes.
8
Remove from the oven and leave to stand for about 5-10 minutes before serving with scoops of ice-cream or dollops of whipped cream while still warm.

https://www.instagram.com/reel/DCysdMmstX9/?igsh=OHBvZzNib3RvaHI2

and
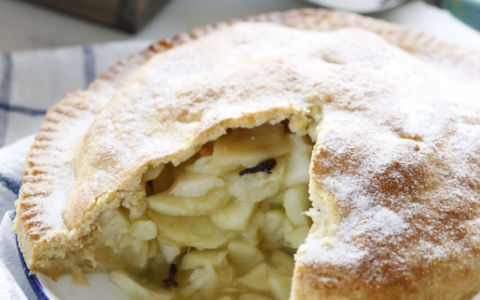
Pastry
Filling
Custard
To make the pastry: Sift the flour and icing sugar into a bowl. Using a round-bladed knife or the tips of your fingers, work in the butter and then mix in the egg yolks. Add the ice-cold water until the dough just comes together. Wrap in cling film and chill for at least 30 minutes.
Preheat the oven to 190°C (375°F/gas mark 5). Lightly dust the work surface with flour.
Divide the pastry into 2 portions, one slightly larger than the other, then roll out the larger piece until it is about 30cm in diameter. Use to line a 20cm pie dish or a 23cm flat plate, gently pressing into the corners. Trim the edges with a knife and reserve the excess for decorating. Place back in the fridge to chill while you prepare the apples.
Peel, core and slice the apples. Place in a large bowl with all but 1 tablespoon of the caster sugar. Add the cinnamon and cloves and mix together. Brush the edge of the pastry with a little milk and then pile the apples into the lined pie dish. Roll out the second piece of pastry into a circle slightly larger than the pie dish and use to cover the apples. Press the edges together to seal, then use a sharp knife to cut away any excess.
Crimp the edges of the tart with a round-bladed knife, using your fingers as a guide. If you wish roll out the pastry scraps and cut into leaf shapes. Brush the shapes with milk and stick on top of the pie. Brush the entire top of the pastry with milk and sprinkle over the remaining 1 tablespoon of sugar. Bake for 25-30 minutes, then reduce the oven to 180°C (350°F/gas mark 4) and bake for another 20-25 minutes, until golden brown.
Meanwhile, to make the custard, place the egg yolks in a large bowl with the sugar and vanilla seeds. Whisk with an electric mixer for a few minutes, until pale and thickened.
Place the milk and cream in a medium pan and bring to the boil, then immediately remove from the heat. Gradually whisk the heated milk and cream into the egg yolk mixture until smooth, then pour back into the pan and place over a gently heat. Cook gently for 6-8 minutes on a medium heat, stirring constantly, until the custard coats the back of a wooden spoon. Keep warm.
To serve, cut the warm apple tart into slices and arrange on warmed serving places with some of the custard. Pour the remaining custard into a jug and hand around separately.
http://www.bordbia.ie/consumer/recipes/desserts/pages/appletartwithcustard.aspx
CategoryCakes
Cook Time3 hours
What you need:
How to:
This mixture can be divided between two 900g/2lb lined loaf tins or two 15cms/6″ round cake tins or a combination of both and will bake in about 1½ hours at the same temperature. This is ideal for those who just want a small cake and the second cake would make a very acceptable Christmas present!
https://www.instagram.com/reel/DCysdMmstX9/?igsh=OHBvZzNib3RvaHI2
and
